|
|
Post by Dan MacMillan on Aug 12, 2013 9:53:43 GMT -5
When will we see this awesome ride in the sun.
|
|
|
|
Post by Dan MacMillan on Aug 1, 2013 21:25:20 GMT -5
As the gt2 tail light is designed for common brake and signal and the Beetle signal light sw is designed for separate brake and signal, you will need a brake/signal convertor box. The type used for trailers will work if your original one is missing or no good. The signal light wires that feed the tail lights go into this box. As for brakes, power from the fuse box goes to the brake light switches then to the convertor box. The box makes it all possible. 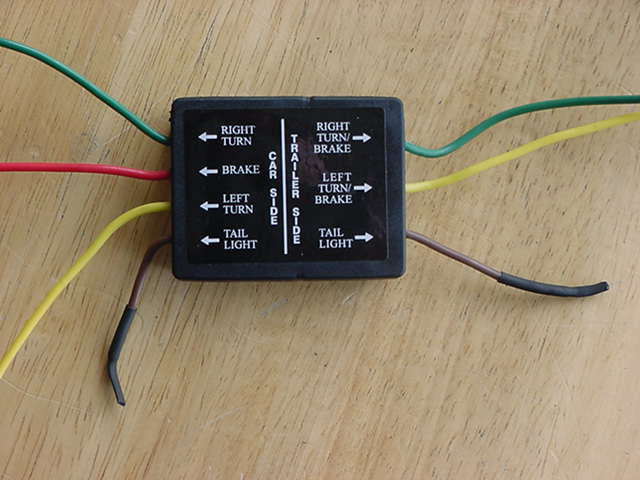 |
|
|
|
Post by Dan MacMillan on Jul 31, 2013 20:39:35 GMT -5
VW color codes state that all brown wires are ground, black is ignition power, power to horn should be a black/white orblack/yellow with the brown going to the horn button through the signal sw harness where it terminates in a spring loaded pin that slides against the ring on the back of the steering wheel, this ring connects to the horn button. The horn button when pressed completes the ground through the steering shaft. A jumper around the shaft to steering box rag joint finishes the path to the chassis. Without the jumper, the steering shaft is isolated from ground. Here is a typical diagram 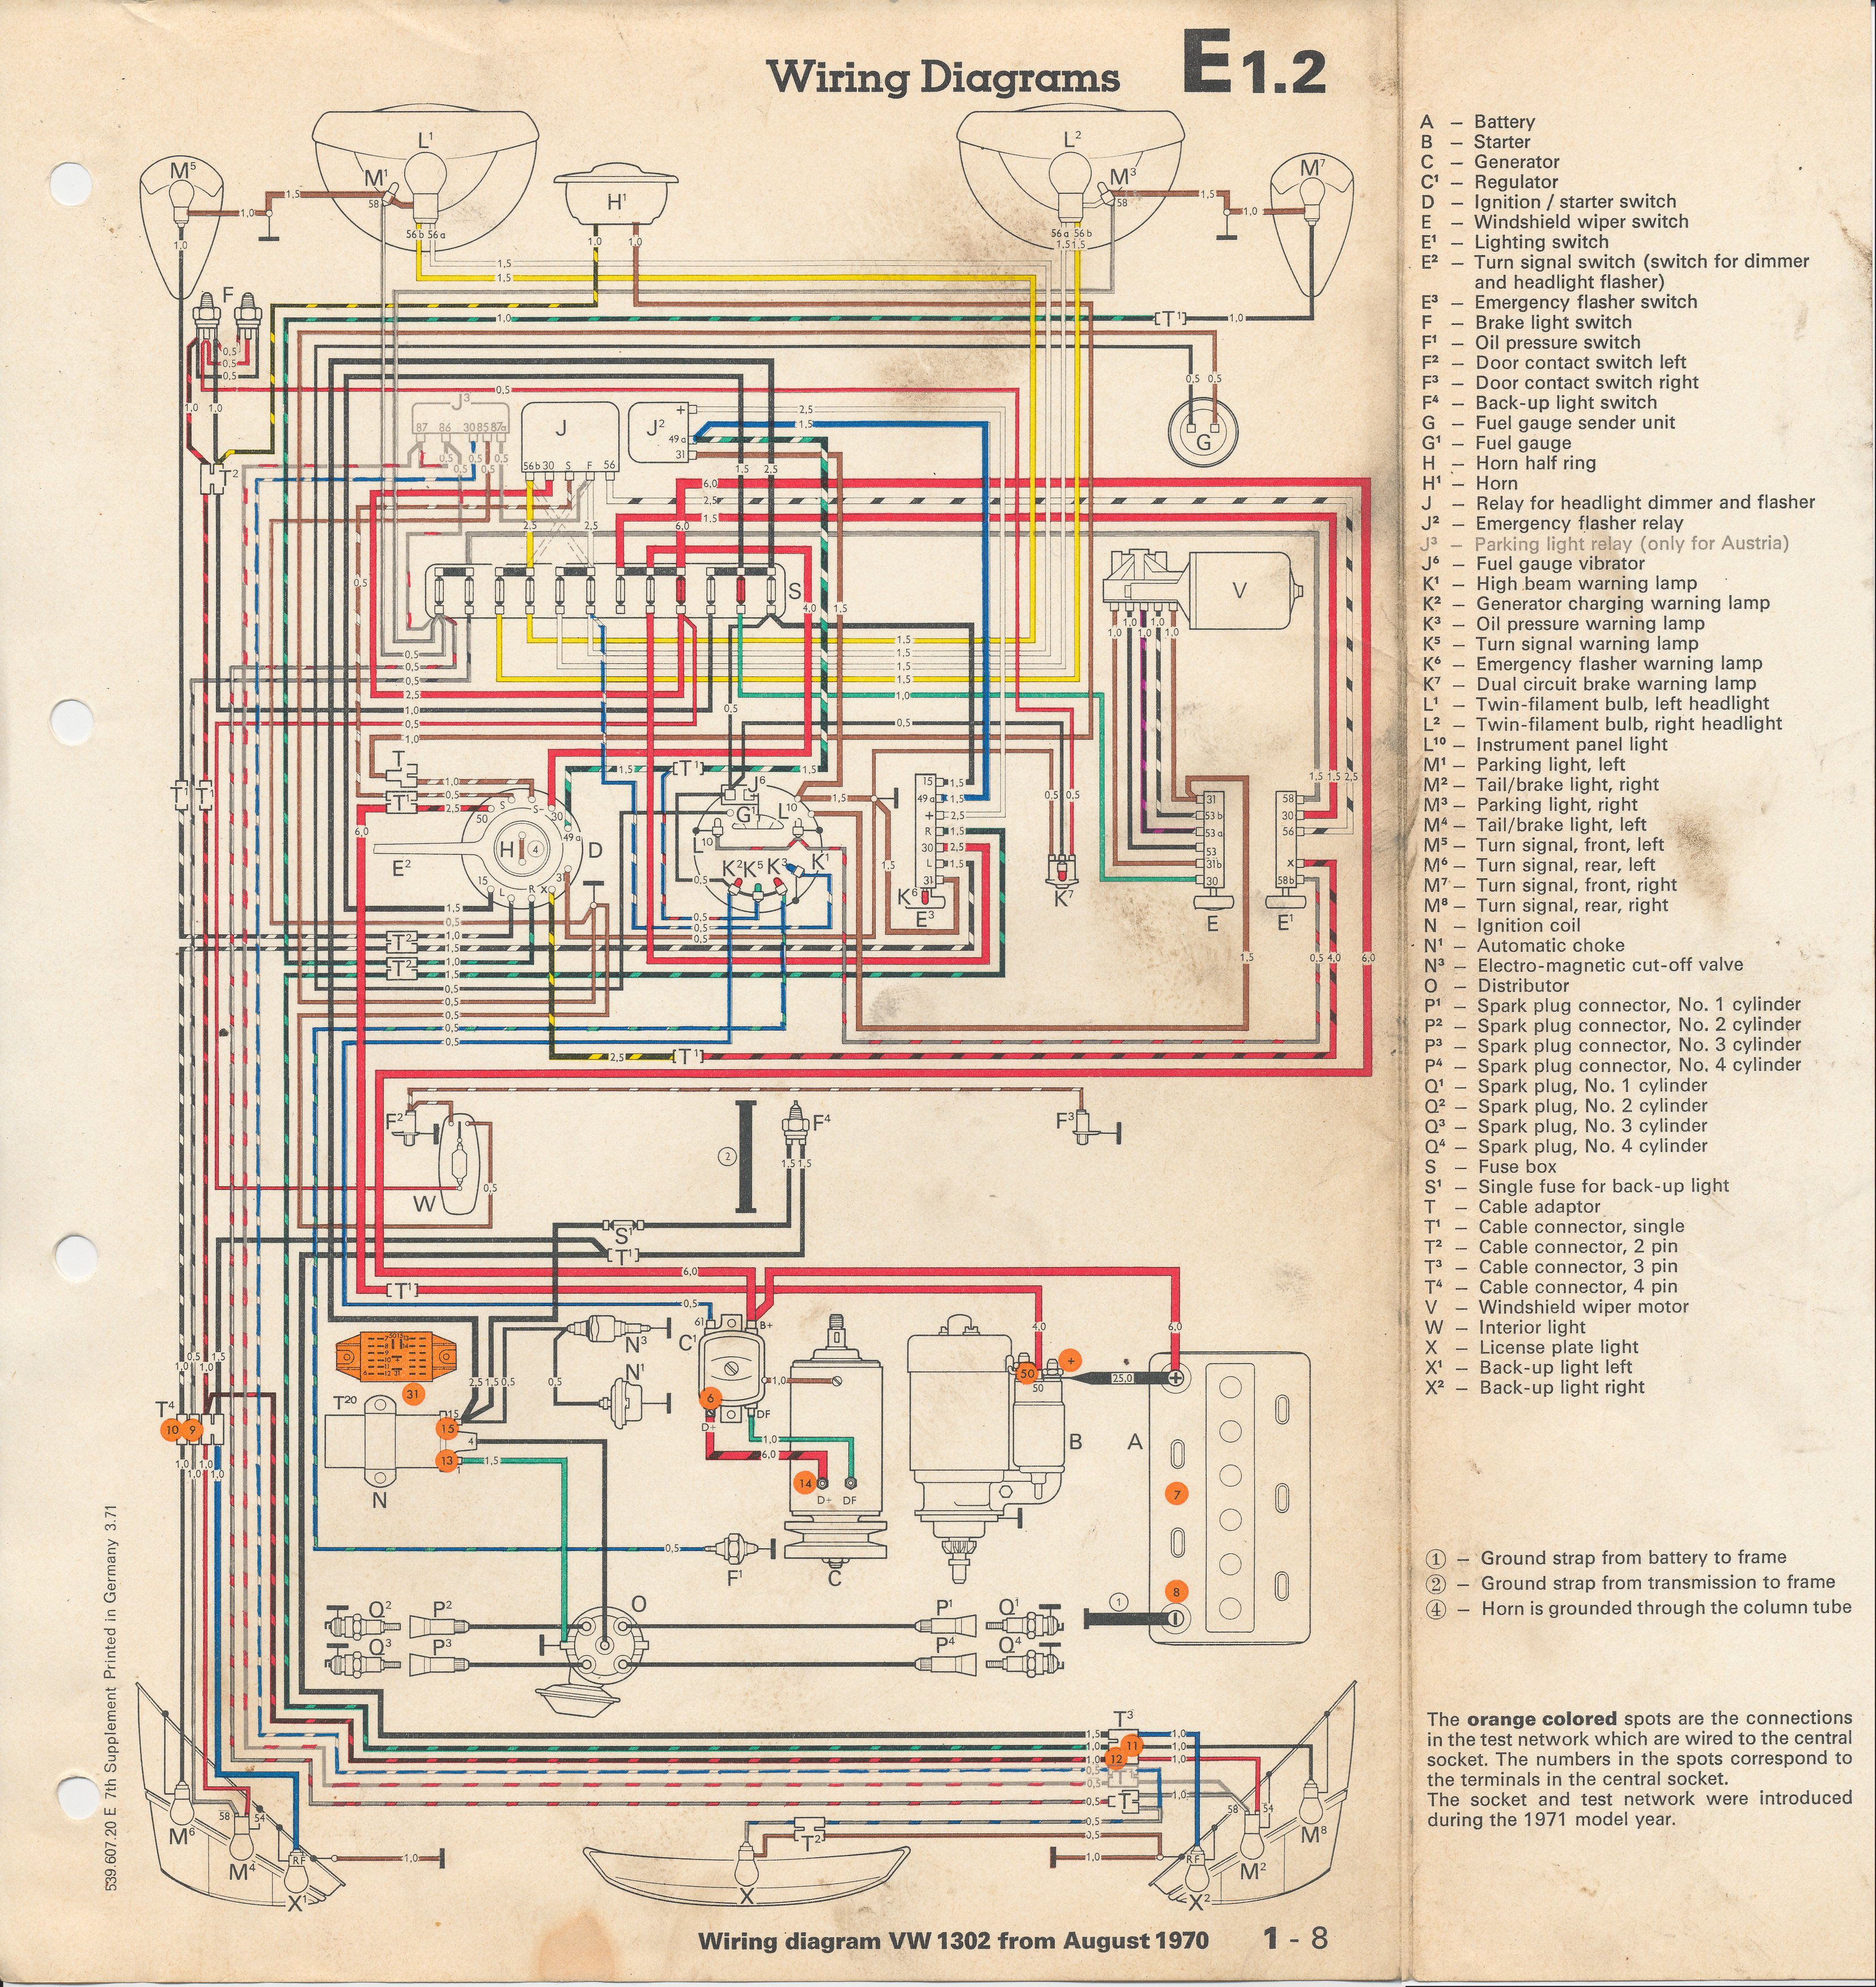 |
|
|
|
Post by Dan MacMillan on Jul 31, 2013 18:49:55 GMT -5
You just answered the age old question, if you hook up a horn backwards does it suck instead of blow. No they blow either way. Just like a reverse wired light bulb will not create a black hole.
vw horns are fed constant power and grounded through the steering col via the horn button. Your ground wire is obviously grounding prior to reaching the button.
|
|
|
|
Post by Dan MacMillan on Jul 31, 2013 11:31:46 GMT -5
Aren't the uneducated computer parts people fun, especially when the computer is WRONG. The only thing worse is when the shelf is empty and you ask if they have more. Typical response is "If there is none on the shelf then we are out of stock". Then you have to force then to get off there ass and look, only to find out there are 50 in the back room. There response quickly changes to "How many would you like?". That's when I say all of them. When they are all brought out I take one and thank him for doing his job and restocking the shelf. Just my way of making life easier for the next customer.
|
|
|
|
Post by Dan MacMillan on Jul 27, 2013 18:12:28 GMT -5
For all of my American friends.
|
|
|
|
Post by Dan MacMillan on Jul 24, 2013 18:26:28 GMT -5
Unless your wife is like mine. I had to clean a Beetle gas tank. Decades of sludge and varnish. I wanted to find a way to boil a mixture of water and washing soda inside the tank. Her suggestion, put it in our new BBQ. Worked perfectly. Stainless steel spaghetti pots work great for mixing automotive paint. Chrome tube style automan [footstools] work great for dunebuggy front bumpers.  Took her a week to notice it was no longer in the living room. Kids bunk bed safety rail for a roll bar.  The license plate is to say thanks for not losing it on me and going postal. |
|
|
|
Post by Dan MacMillan on Jul 23, 2013 21:13:36 GMT -5
highly effective but still needs the separation. |
|
|
|
Post by Dan MacMillan on Jul 22, 2013 20:47:55 GMT -5
What are you referring to as whiskers?
|
|
|
|
Post by Dan MacMillan on Jul 21, 2013 16:44:02 GMT -5
Wyn. see my first post for the pressure specs.
|
|
|
|
Post by Dan MacMillan on Jul 21, 2013 8:01:11 GMT -5
That's right, management thought they would give me a raise as reward for my hard work. I am now the Fixer of Stupidity at the Gates of Hell, 3370 feet underground. That is a raise of 1790 feet. At this rate I will be back on surface in 10 years.
|
|
|
|
Post by Dan MacMillan on Jul 21, 2013 7:38:04 GMT -5
If you live in the US just order the correct ones from McMaster Carr www.mcmaster.com/#9416k17/=nptr0i The 9416k17 is closer to spec than the 9416k16 and is available in 60lbs for the rear glass and 80lbs for the doors. 9416k17 dimensions  D95211 specs, notice length {comp and extended}, tube dia and pressure all too high. Weight: 0.9 lbs Warranty: 1 YR Notes: HoodHood. Quantity per car: 2 Color / Finish: Black / Chrome Compressed Length (Connections On Center) (in): 10.14 Cylinder: Heavy Gauge Steel Cylinder End Connection / Thread: Ball Socket (Nylon) Extended Length (Connections On Center) (in): 16.03 External Cylinder Diameter (in): 0.87 Fluid Damped Action: Yes Gas: Nitrogen Installation Hardware Included: Yes Installation Instructions Included: Yes Maximum Force (lbs): 89.5 Maximum Operating Temperature (°F): 194 Minimum Force (lbs): 74.5 I know "Steve recommends D95211" but who is Steve? The McMaster ones are closest to spec. I think the D95211 will be too long compressed, too large dia to fit between the door and roof, and too strong resulting in a cracked upper door where they connect. |
|
|
|
Post by Dan MacMillan on Jul 20, 2013 19:02:28 GMT -5
The specs on the 95851 are •Replaces lift supports with a 10 mm ball socket rod connector, and a 10 mm ball socket tube connector •Replaces lift supports with extended length between 13.5 In. and 14.5 In. •Replaces lift supports with a force between 20 lbs and 29 lbs Not only are they too weak for the doors they are too short. I listed the specs so you know what is required for the different applications. Superceeded listing from mighty lift www.avmind.com/apd/mightyliftuniversal.pdf |
|
|
|
Post by Dan MacMillan on Jul 18, 2013 17:55:27 GMT -5
From www.bradleygt2.com Part Number: 10154 Description: Gas spring Original Manufacturer: Suspa or Gas Spring Corp. Manufacturer Part No.: 10154 Replacement Supplier: McMaster - Carr Supplier's Part No.: 9416k16-80lbs Link: www.mcmaster.com Notes: These were originally made by Suspa. Their part number is C16-00221. They are still available but you would have to order a hundred or so. 4 springs for Gull wing doorsOriginal Specs: Extended Length: 389mm (15.32") Stroke: 150 mm (6") Shaft: 8mm Cylinder: 18.5mm (3/4") Force: 325N (75lbs) Another option: Steve recommends: MightyLift D95211 Part Number: 2835 Description: Gas spring Original Manufacturer: Suspa or Gas Spring Corp. Manufacturer Part No.: 2835 Replacement Supplier: McMaster - Carr Supplier's Part No.: 9416k-60lbs Link: www.mcmaster.com Notes: These were originally made by Suspa. Their part number is C16-00220. They are still available but you would have to order a hundred or so. Gas springs for hatch back and Engine coveroriginal Specs: Ext. length: 389mm (15.32 in.) Stroke: 150 mm (6 in.) Shaft: 8mm Cylinder 18.5mm (3/4 in.) Force: 250N (56 lbs) Another option: Steve S. recommends: MightyLift D95211 |
|
|
|
Post by Dan MacMillan on Jul 17, 2013 18:48:24 GMT -5
It does not matter if you install a scoop or a better fan, without the hoy cold separation it will run hot. Beetle engines are easy to divide as the tin is basically a rectangle. Cut your filler slightly smaller and drop it down over the engine with a foam strip under the filler and over the stock tin.
On my GT2 the fuel tank is where the engine would normally sit. It is above the trans and the exh is along one side. I recently found out that doing a 3 to 4 hour cruise below 40mph creates enough heat to boil the fuel in the tank.
|
|
|
|
Post by Dan MacMillan on Jul 14, 2013 22:23:51 GMT -5
Welcome, you have joined a great bunch of people. Do you have a GT or a GT2?
|
|
|
|
Post by Dan MacMillan on Jul 14, 2013 15:00:46 GMT -5
Looks like a Peugeot emblem  |
|
|
|
Exhaust
Jul 14, 2013 14:57:52 GMT -5
Post by Dan MacMillan on Jul 14, 2013 14:57:52 GMT -5
checkout www.gdownusa.com ... don't have to worry about clearence in the back. I'm getting this setup next time my empi gt 4tip gets bunged up in a parkinglot entrence.  I did this on one of my buggies. Type 4engine, Stock manifolds installed backwards. 2 Chevy Chevette mufflers, turn aroiunds and tips. Using an old set of cannon mufflers it can be done on a type 1 engine for a lot less than they want.   |
|
|
|
Exhaust
Jul 14, 2013 14:22:59 GMT -5
Post by Dan MacMillan on Jul 14, 2013 14:22:59 GMT -5
Don't forget that they must be isolated from the body/chassis with rubber. When I did this on my beetle I used a 4 into one header. directed it to the right frame horn, 90 deg into a section of stainless flex pipe,then a 90 to head forward. 180 deg into resonator within running board, followed by an expansion chamber that contains the outlets. You can see the edge of the resonator peaking out below the door area. Even at this distance the steel running board gets quite warm. Due to the extra length and bends you should use 2" pipe to keep backpressure to around 2 psi at 2000 rpm. Also if running duals use a crossover or a 4 into 1 header then into 2.  Very crude diagram 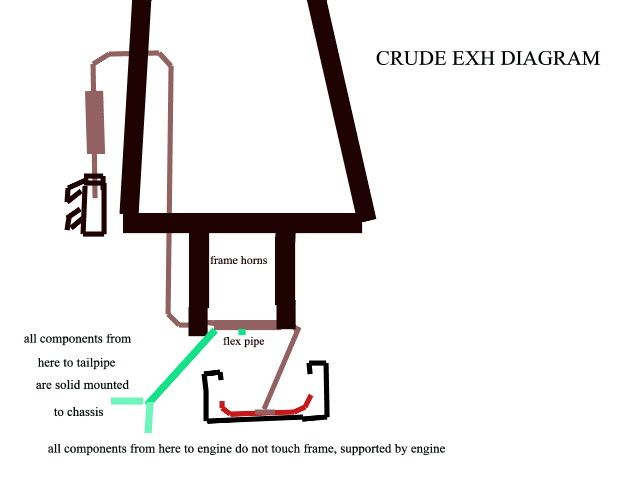 |
|
|
|
Post by Dan MacMillan on Jul 12, 2013 13:17:22 GMT -5
8-)You guys rock!! Where can you get the windshield for $130.00. I read an article where the guy used a sandblaster to cut his window for a chop rod he is working on.There is a little prep but he was succesful with the cut. You can sand blast a w/s with fine grit, tape up the whole w/s with duct tape so not to damage it. Cut along the tape line to the plastic inside on both sides. Use lighter fluit on the plastic & lite it so it will melt., then pull it off using a knife Carefully sand the cut edge with wet sandpaper. Why take the risk? Get the Auto glass supplier to cut it, |
|
|
|
Post by Dan MacMillan on Jul 11, 2013 17:07:58 GMT -5
|
|
|
|
Post by Dan MacMillan on Jul 10, 2013 16:57:09 GMT -5
Depending on the disk kit you may run into problems. If you do, drop me a note.
|
|
|
|
Post by Dan MacMillan on Jul 10, 2013 8:09:11 GMT -5
|
|
|
|
Post by Dan MacMillan on Jul 10, 2013 8:07:04 GMT -5
The only legal option is a windshield made of AS1 OR AS10 OR AS14 LAMINATED SAFETY GLASS. It must have the ASx designation and manufacturer etched into it somewhere.
|
|
|
|
Post by Dan MacMillan on Jul 9, 2013 15:03:30 GMT -5
Nice switches Quick search brought this www.arcade-electronics.com/NTE-54-376-p/nte-54-376.htm NTE 54-376 Pushbutton, Security, 19mm, SPST-NO, 2A, 48VDC, Flat Switch OFF (ON) NTE Electronics Products Page Online Price: $17.87Manufacturer: NTE Electronics Product Notes: Technical Specs (65k pdf) Product Notes: For Specs, Cross References, and Diagrams on NTE Parts click here. Product Code: NTE-54-376 |
|
|
|
Post by Dan MacMillan on Jul 9, 2013 14:57:47 GMT -5
Tabs are to secure front to rear brake line should you decide to run it inside the car, {bad idea in my opinion}.
The tubes at the front of the tunnel sides were from the front floor heat vent doors and the rear ones were for rear floor heat. They are only needed if you choose to install factory heat. They were controlled by the left lever on the park brake handle, right lever turned heat on and off.
Fuel line enters the tunnel on the top just behind the torsion tubes but in front of the firewall. 'It exits on the top side of the left trans support horn. I always run my brake and fuel lines ouside the pass conp under the floor just like any other car. Tucking then into the channel that the floor to body bolts are found keeps them out of harms way. They last a long time and should they leak it will be easy to locate and repair. No chance of gas fumes inside the car.
|
|
|
|
Post by Dan MacMillan on Jul 8, 2013 18:01:15 GMT -5
simply made a bracket to mount the booster to the front of the torsion beams. Muffler clamps work great to put things on the beam. Floor mounted pedal assy shifted 5" to the left. Pushrod goes between the steering box and the left shock tower. Brake sw mounts to the pushrod and presses against the outside of the front firewall. 4 wheel disk, no proportioning valve is used.
|
|
|
|
Post by Dan MacMillan on Jul 7, 2013 18:51:53 GMT -5
bump just for Skippy
|
|
|
|
Post by Dan MacMillan on Jul 5, 2013 21:25:26 GMT -5
no, I just locked it so if I had a failure the door would still open. Removing the button and filling the recess is straight forward glass work
|
|
|
|
Post by Dan MacMillan on Jul 5, 2013 21:04:47 GMT -5
did it to my gt2 controlled by 2 channels of a universal 4 channel remote control that triggers a relay to send power to the contact plate. can be done with an old remote start unit. Here are some pics of the electric doors. Lower contact plate from 198? Chevy Astro Van 2nd pic has part number. 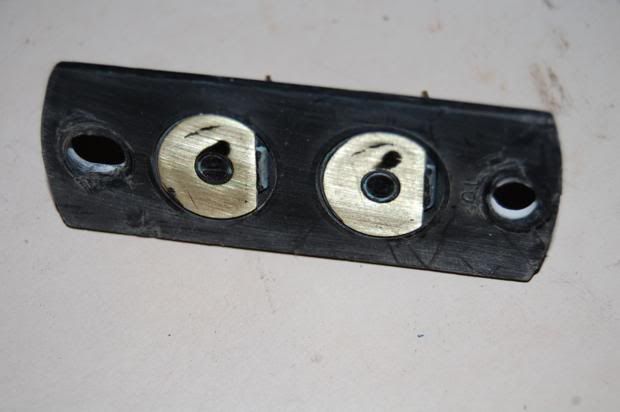 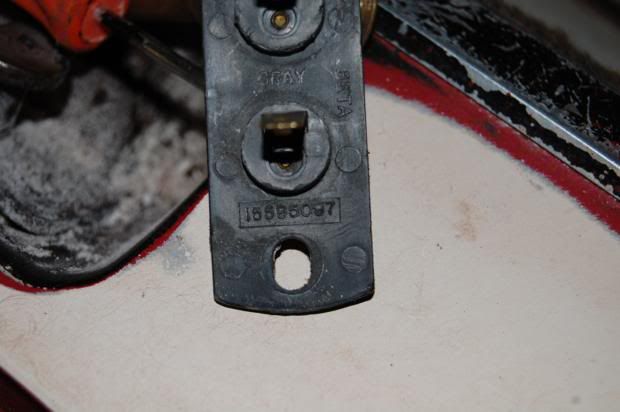 Upper pin plate installs in bottom of door.  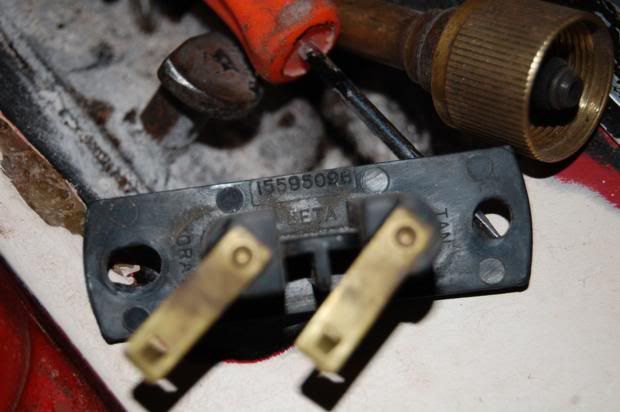 The glass in the lower part of the door opening is very thick, approx 1/2 inch. This allows you to flush mount the contact plate. Since the door travels in an arc, the pins actually slide onto the contacts. The contacts have to be flush.  Pin plate as surface mounted in bottom of door. The 2 shiny bolts still have to have the heads ground thinner as they just touch the lower door opening.  The solenoids I used were found in a box of parts. I have no idea of their origin. I have also used starter solenoids from VW 6v starters. Yes I said 6V. applying 12V to them will not hurt them. They are easy to mount and have tons of pulling power. Not that you need much to operaste these latches. 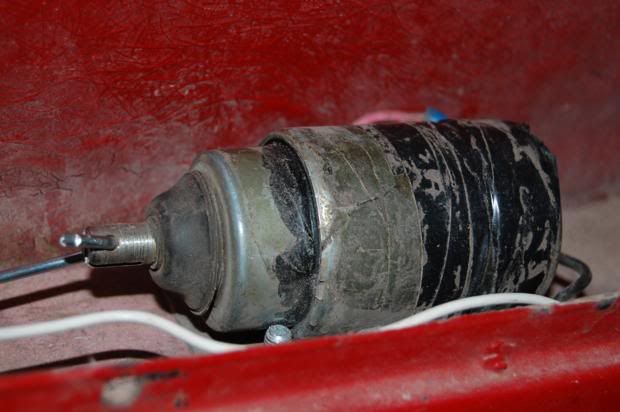 View showing release rod. This is just a piece of 1/8 spring steel, Available at most hobby stores that sell real RC planes. It is bent to allow some flex when the sol pulls it. 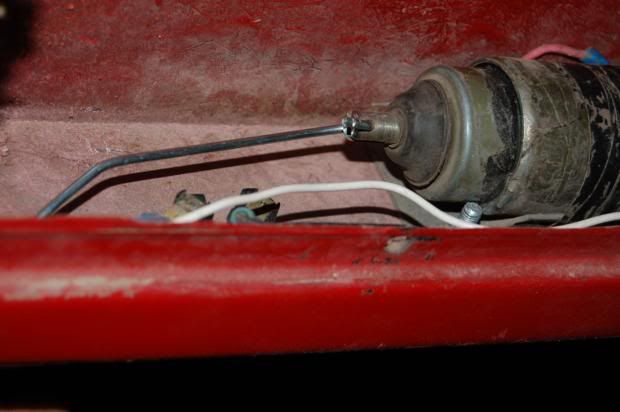 I could not get a good pic of the drivers latch today. I simply welded a bolt to the release arn in such a way that it crosses directly over the release arm pivot pin. To this I welded a nut for the release rod to hook into. There is minimal space to do this so measuring is critical, There can be no interference. Tomorrow I will removew the latch for a pic. On the pass side this welded bolt is not necessary as the latch already has to be pulled forward. Still to install is a manual lock. All electric doors require one to eliminate any chance of the door opening on it's own |
|


