|
|
Post by jspbtown on Jan 6, 2012 17:59:49 GMT -5
Yellow power to both center tabs.
Connect bottom right tab to left upper tab then to parking lights
Top right tab to VW dimmer switch
VW dimmer switch to hi and low beams (3 tabs on VW dimmer switch).
|
|
|
|
Post by jspbtown on Jan 6, 2012 15:03:17 GMT -5
Really the absolutely most simple way is a DPDT switch and the VW hi/low beam selector.
|
|
|
|
doors
Jan 6, 2012 11:56:57 GMT -5
Post by jspbtown on Jan 6, 2012 11:56:57 GMT -5
"Butt Sag" search will get you what you want.
|
|
|
|
Post by jspbtown on Jan 5, 2012 22:12:32 GMT -5
So you have 3 tabs on the switch. I am assuming you have the switch working from left to right versus up and down? Assuming that...
The middle tab is your power supply. Good.
The right tab has the brown wire on it for the tail lights? And crimped into the same connector (I assume) is a wire that goes to the left tab and into that connector is also the wire for the headlights low beams?
|
|
|
|
Post by jspbtown on Jan 5, 2012 22:00:38 GMT -5
The way you have it now you will get parking lights and headlights in either the up or down position. You can't have a the wires connected on one tab and not have that connection cause all to light when any of the wires (tan or brown) are energized.
If you want to have a toggle do that you need a DPDT toggle.
|
|
|
|
Post by jspbtown on Jan 5, 2012 9:12:25 GMT -5
I feel your pain. I thought I nailed the Avenger wiring but almost every gauge was hooked up wrong (swapped the grounds and the sender tabs).
|
|
|
|
Post by jspbtown on Jan 4, 2012 16:01:07 GMT -5
Thank you.
Thats a nice Avenger thats on there. I like the early Vette handles. No windows though. I can understand...they are a pain in the backside!
Plus I like where my shifter sits...its about 8" back from the stock location.
|
|
|
|
Post by jspbtown on Jan 4, 2012 11:20:05 GMT -5
Wiring should be as clean as neat as possible. A schematic of what was done should also be kept with the car. With my Avenger I am providing the new owner with about 15 pages of wiring diagrams and notes. If anything ever fails he will be able to diagnos it quickly. Of the 10 kits I built every none except one (the Manta...that was essentially a clean and buff) was re-wired from scratch. 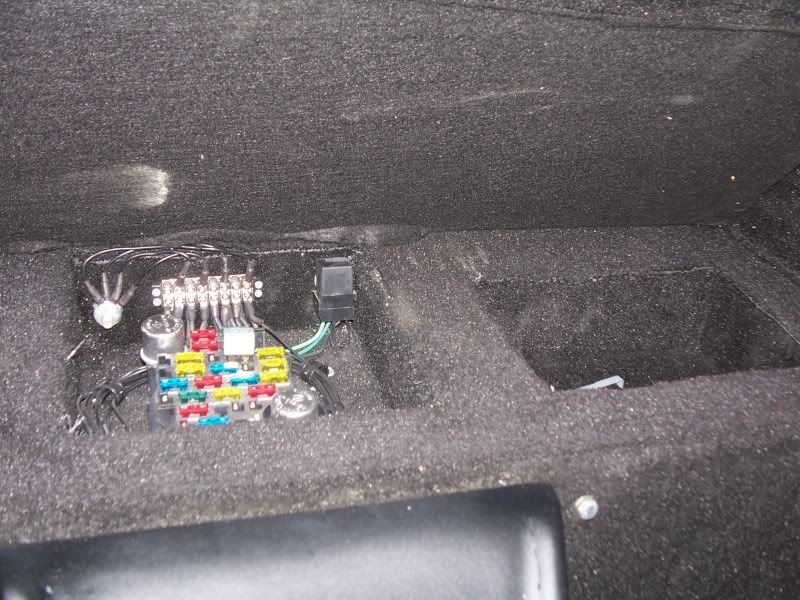 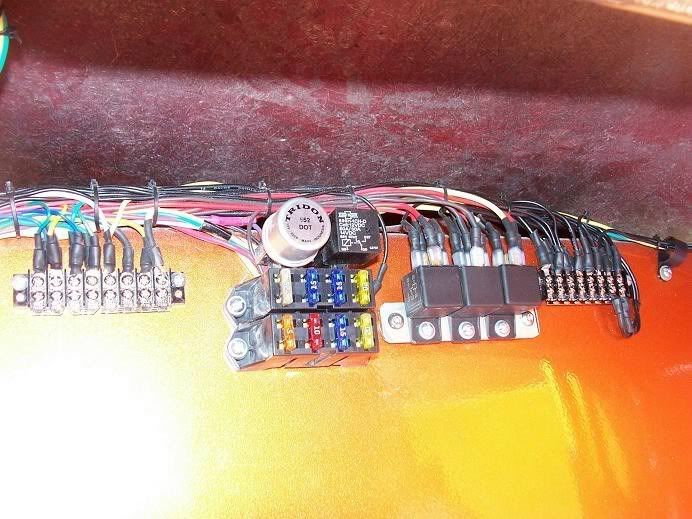 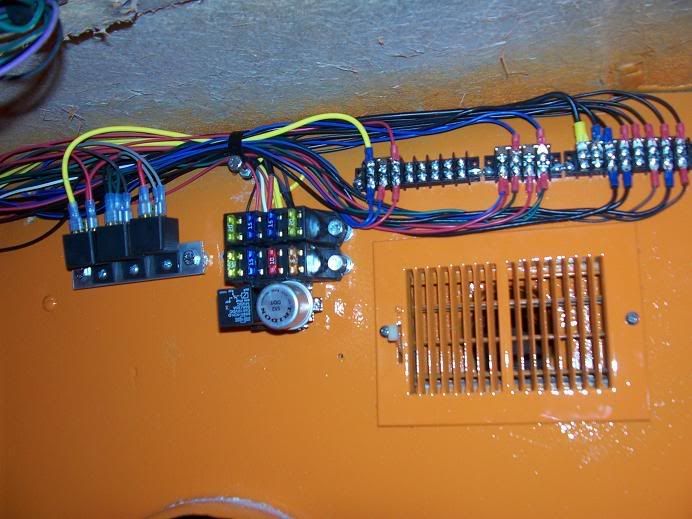 |
|
|
|
Post by jspbtown on Jan 4, 2012 10:49:53 GMT -5
Sold.....heading to Michigan.
|
|
|
|
Post by jspbtown on Jan 4, 2012 10:27:23 GMT -5
Ok...so you do sand in between layers to create a mechanical adhesion.
Just wanted to clarify for others on the board.
|
|
|
|
Post by jspbtown on Jan 4, 2012 9:58:33 GMT -5
So you just lay the next layer directly on top of the prior, already cured layer?
|
|
|
|
Post by jspbtown on Jan 4, 2012 9:49:20 GMT -5
SOLD...on its way to Puerto Rico!
|
|
|
|
Post by jspbtown on Jan 4, 2012 9:17:38 GMT -5
" I like to wait for each layer to cure personally, whenever I am doing fiberglass work. "
How do you ensure adhesion between the layers? If the resin is cured then you won't get a chemical bond so do you rely on a mechanical bond? How do you achieve that so it was delaminate?
|
|
|
|
Post by jspbtown on Jan 4, 2012 9:15:44 GMT -5
The way it looks is that the tan & green wires should be just loose (ie: not attached to anything) wires that run from the switch to the headlights/parking lights.
What I think you should have is the yellow supplying power to the switch, then (however you can do it...I used terminal blocks) the parking light wires to the parking light circuits and then a wire to the dimmer and from the dimmer the two wires that feed the hi & low beams.
|
|
|
|
Post by jspbtown on Jan 3, 2012 21:51:48 GMT -5
So you have a wire from the fuse block to the switch and then a green only to the high beams?
|
|
|
|
Post by jspbtown on Jan 3, 2012 12:35:52 GMT -5
License plate wire may split off the rear parking lights wire so it may not come from the front.
Toggle switch works just fine...but you may have to many wires coming off of it.
Which color wire did you pull your healights from?
|
|
|
|
Post by jspbtown on Jan 3, 2012 9:11:30 GMT -5
Off that toggle switch you should have power from the blue wire and then really too many wires coming off of that switch (wire to dimmer, brown wire to front lights, brown wire to rear lights, lt green for license plate, and dash lights). How do you have them wired? Are they just tapped into eachother or did you use a junction block?
So if you look at the back of the fuse block the wire coming from the brake light circuit is orange?
|
|
|
|
Post by jspbtown on Jan 2, 2012 23:37:33 GMT -5
"It takes along time to build up the layers of fiberglass...as each layer must cure."
whcgt..are you saying you can only lay 1 layer at a time of matt/resin?
|
|
|
|
Post by jspbtown on Jan 2, 2012 23:35:48 GMT -5
So it looks like purple goes to the brake light switch at the master cylinder.
I would use the orange to run the brake lights.
The browns should all come together off the headlight switch.
Tan & light green to your dimmer switch.
Blue comes from your headlight switch to your dimmer.
Green & blue for right turn.
Yellow & light blue for your right turn.
|
|
|
|
Post by jspbtown on Jan 2, 2012 19:03:42 GMT -5
"How the rebel harness is set up is the 2 wires that go to the brake lights and then a brake light and brake light power wire that I assume should both go to the brake light switch?"
This line confuses me. Can you scan or send a link to the Rebel wiring diagram?
Oh..and Skip...he can have 2 1157 bulbs. The top can be brake/park and the bottom can be turn/park. Having all 4 lights light up on the park circuit is fine.
|
|
|
|
Post by jspbtown on Jan 2, 2012 15:12:33 GMT -5
Brakes should be real easy. Wire from fuse panel to brake light switch at master cylinder. Wire from master cylinder to left brake light and then over to right brake light. They really should never even cross.
Headlights are the same thing. From the switch you should have a headlight supply that goes to your hi/lo beam selector, a wire that goes to your rear parking lights, and a wire to your front parking lights (and maybe a wire for your dash lights).
The only thing that they all have in common is your rear lights. Make sure all your wires from the rear lights are connected right. Are you sure the ground wires are actually the ground wires? What are they black, green and red?
Assuming black is ground then you should have those 4 wires attached to each other and a ground. Assuming green is the parking lights then those should all be attached and should go directly to the headlight switch. On the inner two lights the reds should be connected and go directly to the master cylinder. The outer reds should go independently to the blinker switch.
|
|
|
|
Post by jspbtown on Jan 2, 2012 14:27:18 GMT -5
Alternator is easy as pie. You get a whole kit for under $150 which includes the backing plates, the alternator, the strap, often the pulley and the stand. You use your same fan and spacers.
Two wire hook up. 1 wire to the large lug on the starter and the tab goes to the idiot light (the other side of the idiot light should come straight from the key "on" position).
Normally the "power" whcgt is referring to comes from the ignition switch...and it is supposed to be powered. What is actually happening is you are receiving a ground signal from the regulator where you should be getting a 12V+ signal.
|
|
|
|
Post by jspbtown on Dec 28, 2011 19:17:59 GMT -5
It won't fit and you will ruin the very expensive piece including the powder coating in order to modify it. A large waste of money.
Even if you didn't care about the price & didn't care about ruining the powdercoating, and didn't mind cutting up $1500 worth of tubing, you would still need to be a very competent welder to make it right and safe.
If you really need a cage find a local fabricator.
|
|
|
|
Post by jspbtown on Dec 28, 2011 18:30:27 GMT -5
Thats a 1600 50hp. Its a nice motor to have. PICT 34 is the right (albeit basic) carb for that motor.
Sounds like you found your problem.
|
|
|
|
Post by jspbtown on Dec 28, 2011 15:43:59 GMT -5
Come on Jeff....you know how easy it is to roll the GT's over with their high center of gravity.
(Insert smiley face here if I knew how)
|
|
|
|
Post by jspbtown on Dec 28, 2011 13:36:44 GMT -5
77 would be a 1600 but again...the number on the engine would help to eliminate alot of people just guessing.
And since it might have been fuel injection one could again speculate that the carb on it is not original to the engine. So if the carb is not an appropriate pict 34 (for a stock one) and is maybe a pic30 then the carb might not be big enough for the engine.
A pic would help there too..or at least a number off the carb. Again, to prevent needless guessing.
|
|
|
|
Post by jspbtown on Dec 27, 2011 22:20:35 GMT -5
Post the ID number of the engine (located under the generator mount) and we can tell you what it at least started out as. Also, a pic of the engine will help see if anything huge is out of order.
|
|
|
|
Post by jspbtown on Dec 26, 2011 22:25:32 GMT -5
Don't use electrical tape to shield anything in the automotive world. It has no business in a car for any reason. Use shrink tubing to cover anything that needs to be covered.
Double check your gauges to make sure the sending unit wire and grounds are attached to the correct tab (yeah...don't ask....in that "wonderful" wiring job I did on my Avenger I crossed the ground wires and the sending unit wires on almost every gauge...idiot!).
Also you need to have the tank itself grounded with a wire from a ground to the sender. And on the oil sender you can't use any sealant.
Use a meter to test for voltage at the generator (should be way above 12 volts) and at the regulator (whee the heavy wire attaches)...which should be 14 or so volts. If either is out of whack post it back here.
|
|
|
|
Post by jspbtown on Dec 25, 2011 14:03:31 GMT -5
And don't forget that really none of the wiring harnesses will have the wire you need for the grounds...and there are lots of them.
Plus...depending on what your building your average Bradley can get away with as little as 8 circuits.
|
|
|
|
Post by jspbtown on Dec 21, 2011 15:05:31 GMT -5
William.....lots of things escape you.
|
|

