|
|
Post by centralvalleygter on Aug 15, 2010 19:12:49 GMT -5
Bob,
The gulls are okay cuz they themselves are removable. I'm not sure how they define removable (theoretically everything is removable), it is either tied to time or whether tools are needed (I think the DOT regs are on the net somewhere- haven't had a chance to search recently- I had an hardcopy in the 80's when I was building a trailer and remember being sidetracked reading about removable tops at that time). I think that if the rear window cowl or frame or if the window itself is "designed" to be removable, it is okay, however, it would probably be best to find the regs so you can cite rule and paragraph number if it ever comes up.
Sincerely,
|
|
|
|
Post by centralvalleygter on Aug 15, 2010 0:14:53 GMT -5
Bob,
From what I understand as long as the frame for the glass is removable, it is considered a convertable and plexi or lexan can be legally used (one reason I made my back window cowl removable). That is why plexi can be used as the GT gull wing doors. I had a fiberglass hardtop on my MGB and both the rear window and quarter windows were plexi. I'm not sure what the rules are when the window frame is part of the main body.
I'm about to undertake my second attempt at fiberglass doors myself. What you are doing is looking good as far as I can tell.
Sincerely,
|
|
|
|
Post by centralvalleygter on Aug 12, 2010 18:09:49 GMT -5
I have thought about making this conversion (especially before getting my SB100 smog exemption), but still might consider it in the future. One thing I was wondering about was the range. If I remember right to get similar range the volume of the propane tank must be quite a bit larger than that of the equivalent gas tank. Do you put the propane tank in the same location as the gas tank? Do you install additional tanks?
Thanks in advance for addressing my questions.
Sincerely,
|
|
|
|
Post by centralvalleygter on Aug 12, 2010 13:57:18 GMT -5
Now why wasn't I smart enough to offer to do that? Some of us are just better at meeting the actual needs of others. Thanks Wyn for the help.
Regards,
|
|
|
|
Post by centralvalleygter on Aug 12, 2010 12:13:29 GMT -5
First, as mrbigh noted above & I indicated previously, the photos don't actully upload to this server/site (like facebook, craigslist, etc.) but must load from a remote server each time the thread is loaded. Your computer directories are not directly accessible to the internet so it can't load them from your computer even if it was on all the time. So, you must put them on an internet server somewhere before you can link them to this site. Secondly, you have to put the path to the pictures between the ![]() path [/img ] tags. Thirdly, the coding for the board site would try to post a picture instead of showing you the code for posting a picture if I didn't add a space between the "g" and the "]" (or did something similar to that so the board wouldn't recognize the image tag). You don't really have to understand that to post pictures, I was just explaining how I could show you and why my example would look slightly different than yours would to function properly. Regards, |
|
|
|
Post by centralvalleygter on Aug 12, 2010 10:53:48 GMT -5
I too welcome you. This place is a great resource of fixing or customizing your Bradley. I got to say that you're brave leaving those wirdshield wiper arms on without blades or a rubber hose or something on the ends - could put some scratches in the windshield if turned on bare like that.
Warmest Regards,
|
|
|
|
Post by centralvalleygter on Aug 12, 2010 10:01:57 GMT -5
The pictures have to exist on a server somewhere else (your own website, photobucket, etc.). To have it show up on the site you can either click on the image icon and enter the address to the picture between the ![]() [/img ] flags or actually type in the tags. For example: ![]() www.kcsnet.com/~stevenr/bus/BUS1.JPG[/img www.kcsnet.com/~stevenr/bus/BUS1.JPG[/img ] (Note I put in spaces after the "g's" so the board wouldn't try to post an image). Hope this helps! |
|
|
|
Post by centralvalleygter on Aug 10, 2010 14:47:57 GMT -5
Well, I've pretty well finished the inside of my vw bus. Following is a photo of the middle section with the pedestal back seat. I made this middle section modular so I can pull out the seat and put in a camping modual (when I get it built). 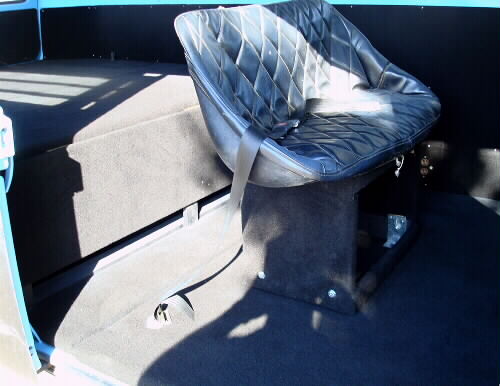 Below is a picture with the extension up that forms the area for a full size double bed. 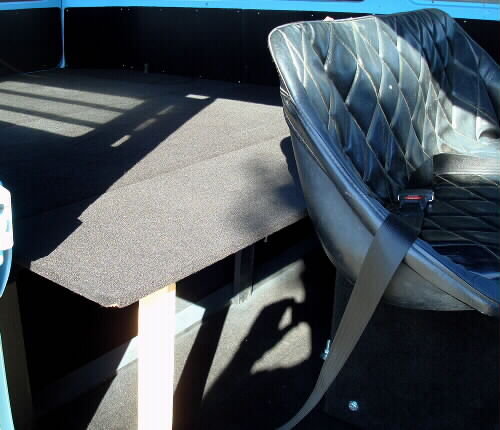 Here is a view from the cab area looking back. You can see the rear seat and cabinets. 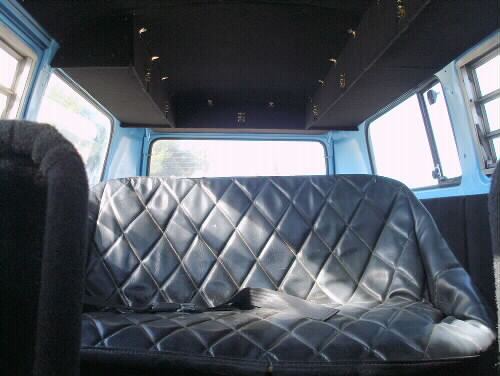 Lastly, here is another shot of the cab with the interior posts etc painted blue to match what at least part of what the exterior will ultimately painted. 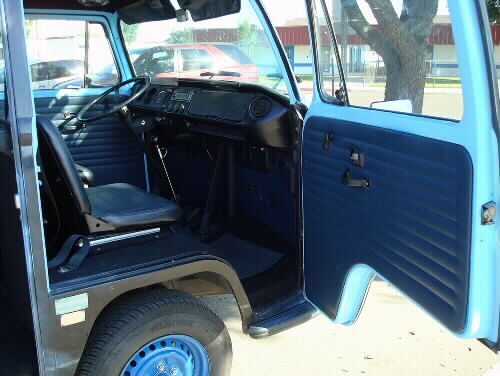 I'll eventually start the outside, but it may be a while as school is starting again. warmest regards, |
|
|
|
Post by centralvalleygter on Jul 31, 2010 18:58:02 GMT -5
My brother has had 2 CB performance EFI systems. The older one began to give him problems and when they couldn't completely iron it out they offered him one of their new systems at a "price he couldn't refuse" (we live about 30 minutes from CB performance shop). He said the power increase and the fuel economy improvement are substantial with the EFI.
Sincerely,
|
|
|
|
Post by centralvalleygter on Jul 31, 2010 18:53:34 GMT -5
I sent a pm, but no response - of course he has to login to get it, but I can't find an email address as he has it hidden. I'm a bit concerned as he had several potential crises issues going on. I miss him too.
|
|
|
|
Post by centralvalleygter on Jul 28, 2010 10:41:11 GMT -5
There is a difference between the GT and the GTII in this area, Jeff is addressing the original GT, in which the 3" drop works. Also note this all assumes use of the the orignially supplied fiberglass seats. I believe the Porsche 914 seats are narrow enough to accomodate any drop in both the GT & GTII. Most after market seats are also too wide, though there are a few around that work. I know in the GT, the magic width at the base is 19", but most after market seats are in the 20" to 22" range at the base, so you have to be careful.
Regards,
opps, I guess while I was composing this JSPBTOWN posted, so you got a double answer that says basically the same thing.
|
|
|
|
Post by centralvalleygter on Jul 24, 2010 21:27:20 GMT -5
It sounds like you may be dealing with the "infamous butt sag" that happens to the GTII. I understand it affects the door openings.
Do a search for "butt sag" and I think you'll come up with a thread or two on the symptoms and fixes. I think there have been some threads on this since we moved to this board.
Regards,
|
|
|
|
Post by centralvalleygter on Jul 21, 2010 11:11:25 GMT -5
I've had three project cars - a BAHA bug built from scratch (started with only chassis, and main body-no engine, no fenders, no hood, no engine cover, etc.), Bradley GT (big stuff done before I got it, but I've done or redone lots) and VW microBus (ultimately a complete custom restoration-just about finished with mechanics and interior, haven't started exterior).
There are a couple of things that have helped me keep going.
1. Before you quit for the day, set yourself up for next phase so that you know exactly what you'll do at the start of the next session and get a sense of gratification quickly. Admittedly I have OCD tendencies (I lay out clothes & breakfast the night before, etc.), but this helps me get back into it, knowing exactly what to do and that I will quickly accomplish something. That motivates me to keep going, even if it is only to "set myself up" for the next session.
2. If you are at a phase that you do not particularly enjoy, try to find someone who is good at that activity see if they will meet with you to work at set times in trade for you helping them with something. It's sorta like going to the gym to workout, much easier to keep at it if you are meeting someone at a specific time and enjoy some fellowship during what otherwise might be drudgery. For me, this is usually my brother. We have complimentary skills and preferences (me - electrical, finesse fabricating; him - heavy duty wrenching, welding, etc.), so we work together on various aspects of each other's projects.
Warmest Regards,
|
|
|
|
Post by centralvalleygter on Jul 17, 2010 22:01:48 GMT -5
Here is Big Bob's Web Site Link - It is on the members page and it is one of the icons on his posts. mysite.verizon.net/bobthagard1/car/He doesn't have the sports pak, it was on his page showing other people's cars. However, he does have a nice site showing the work he is doing on his car. Sincerely, |
|
|
|
Post by centralvalleygter on Jul 16, 2010 11:10:44 GMT -5
|
|
|
|
Post by centralvalleygter on Jul 14, 2010 0:16:07 GMT -5
|
|
|
|
Post by centralvalleygter on Jul 12, 2010 23:51:29 GMT -5
Yes, the phrase "freeway flyer" is used in the VW tranny industry to indicate a higher gearing. Different tranny builder's have their own various ways of getting the higher gear ratio, most (but not all) just affect 4th gear. See Jeff Troys post above.
Regards,
|
|
|
|
Post by centralvalleygter on Jul 11, 2010 23:02:34 GMT -5
Below is a link to the thread where Jeff provides an extended destcription on the door sizing procedure. bradleygt.proboards.com/index.cgi?action=display&board=general&thread=186&page=1In case you haven't noticed you can search this site by keywords like Google, etc. The button is at the top of the page next to the microscope. Just make sure you change the days to something like 365, as the default 7 days is usually not too helpful. Sincerely, |
|
|
|
Post by centralvalleygter on Jul 11, 2010 21:58:39 GMT -5
In case you don't know about searches on this board, one of the options at the very top of the page is the "search" (with microscope). If you click on it it gives you options like Google, etc. Just make sure you change the days (time) option, because it defaults to 7 days, I usually put in 365 days. Following is one string done on fuel tanks. bradleygt.proboards.com/index.cgi?action=display&board=general&thread=287&page=1The standard GT 1 fueling design is really bad. The fill tube coming off the side of the tank makes for very slow filling after the tank is half full. Best to make the fill tube dump directly into the tank from the top. What you describe was the fuel lid assembly included in the original Bradley kit, which was obtained from a marine supply company, as was a good number of parts on the original Bradley. Regards, |
|
|
|
Post by centralvalleygter on Jul 11, 2010 19:14:55 GMT -5
I've been working some on the bus. Mainly on the back third of the interior. I have installed some ceiling level cabinets. The first picture shows the framing for the cabinets. 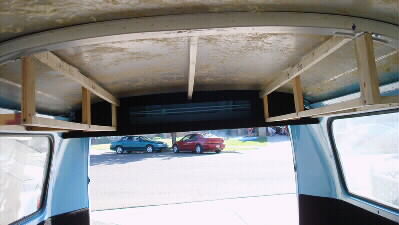 ============================================== The second picture shows the fuse block for the accessories that will run off the deep cycle battery in the rear of the driver's side cabinet. 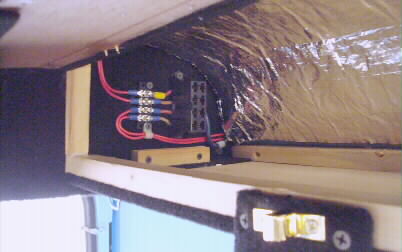 ============================================== Here are several pictures of the finished interior of the rear third of the van. 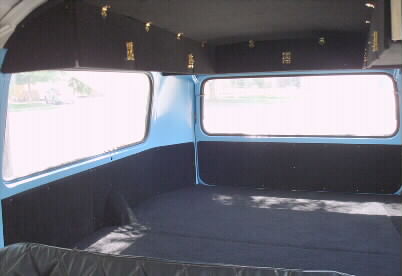 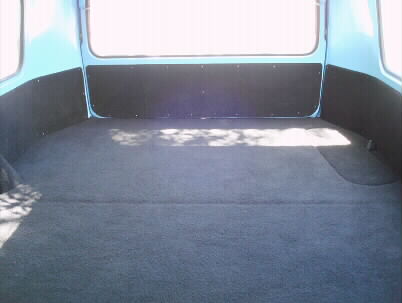 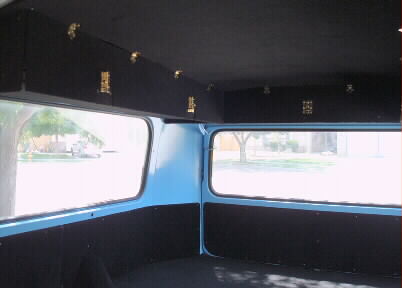 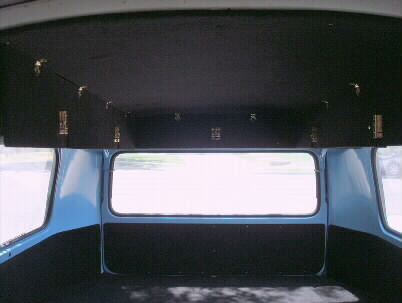  ============================================= The last photos show how I carpeted the back side of the seat dividers. 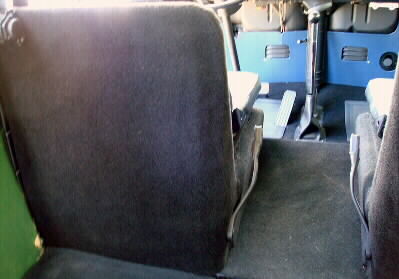 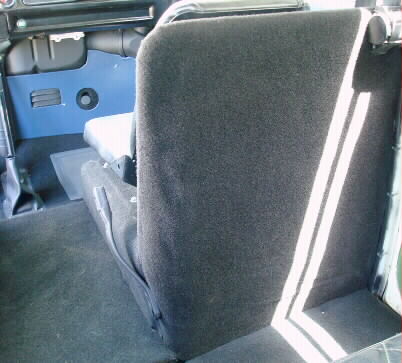 That's it for now. Regards, |
|
|
|
Post by centralvalleygter on Jul 11, 2010 18:19:14 GMT -5
Someone has definitely done a shade tree mechanic modification to your tin. The tins are normally symmetrical with respect to the heater air supply outlets, so the left (driver's) side should look the same as the right (passenger) side. It looks like someone installed something (A/C compressor?) that conflicted with the left side outlet, so they blocked it off and fabricated a new outlet on the edge. Pick up a HOT VW's magazine and there will likely be lots of pictures of engines in various stages of customizations. Could also order back issues. There are also several ACVW manuals out there.
Best Regards,
|
|
|
|
Post by centralvalleygter on Jul 11, 2010 18:08:04 GMT -5
I haven't had the privilege of cutting down a door (yet?), but I understand that there really can be several inches of difference from car to car and that is why Ray makes them that much oversize. It is normal. Jeff has a picture or two on his CD of the cut down process. Even experienced people say give yourself a full day of time, it is not a quick process.
In my limited experience with plexi & lexan, it appears that a metal cutting abrasive wheel (mine is powered by an air compressor) seems to yield the best cut (and grinding) without causing micro cracks that later become macro cracks.
Regards,
|
|
|
|
locks
Jul 6, 2010 10:17:17 GMT -5
Post by centralvalleygter on Jul 6, 2010 10:17:17 GMT -5
Thanks for the correction on the type of lock Jeff, I knew what I was stating wasn't quite right, but I could only think of the case name. Sorry for the misinformation.
Sincerely,
|
|
|
|
locks
Jul 6, 2010 0:00:04 GMT -5
Post by centralvalleygter on Jul 6, 2010 0:00:04 GMT -5
The original Bradley GT did just use snap hooks or loops, but added a regular hardware store "window case" type lock on the driver's side. So to lock the car you used the snap hooks on the passenger side and then the the "window case" key lock on the driver's door. It was really just a deterrent, not a truly secure system.
From what I understand the snap hooks were really bad (stretched, come loose, allowed rattles, etc.), so most people fabricated another fastening system. Jeff shows a strap/snap system on his CD.
So, you may want to try your hand at engineering something, if you want more security. Jeff Troy's theory is that he'd rather have them be able to break in easily if they are dead-set on stealing something rather than have them do significant damage to the car in the process. Maybe an elaborate alarm would be better than a vault-like mechanical security mechanism.
Regards,
|
|
|
|
Post by centralvalleygter on Jul 4, 2010 23:36:00 GMT -5
|
|
|
|
Post by centralvalleygter on Jun 30, 2010 14:15:18 GMT -5
Jeff's CD does have the manuals scanned in - See Section 10. Here is info from previous post.
=======================================================
The information for the CD is on the old site, which is suffering from an attack. Rather than have you risk it, here's the table of contents. Most owners have found the CD to be very helpful.
Bradley GT Information for Owners on CD-ROM
Section 00: Text files
Section 01: 1976 Original Configuration - Metallic Brown
Section 02: 1980 First Rebuild - Cream, Copper and Brown
Section 03: 1985 Second Rebuild - White, Blue, Pink and Purple
Section 04: 1993-1995 Complete Restoration
Section 05: 1995 Shows
Section 06: 1996 The Wreck
Section 07: 1997-2000 Re-Body Donor Preparation
Section 08: 2000-2002 Re-Body
Section 09: Post-2002 Car Shows
Section 10: Bonus Section - Bradley GT Manuals and Literature
Section 11: On The Road Restoration Parts
Section 12: Restoration Parts, Literature and Instructions
Section 13: Sun Ray Products - Bradley GT Kits and Parts
Section 14: Reference Materials
Section 15: VW Part Source Catalog
Section 16: Work In Progress Files (additional files to be edited for all sections)
The PayPal link is on the old site with the description, so here are two ways to get it.
1. Send a PayPal for $35 to jefftroy@aol.com
2. Send a $35 check or money order to Jeff Troy, 759 New Holland Ave. Lancaster PA 17602
Call if you have any questions: 717-917-3670
========================================================
Sincerely,
|
|
|
|
Post by centralvalleygter on Jun 29, 2010 13:14:13 GMT -5
Just for the sake of knowing the more pictures the better, here are some pictures I have on my hard drive of the front supports on mine. This pics were taken at various stages of the history of the car.     I know that Gary Hammond has posted some pics of his before also, but I think he was showing how he modified them for Clarence of his anti-sway (torsion) bar. Regards, |
|
|
|
Post by centralvalleygter on Jun 29, 2010 10:37:40 GMT -5
Correction concerning the bus info I gave above. The info I gave was according the bus' own speedo. After writing the post I was making a trip in my bus and remembered that it's speedometer is off by 6-7 mph at 60+mph according to my GPS (which I understand was typical of all american vw busses at the time because they used 14" wheels here whereas 15" wheels were used in Europe & Latin America). So that means at a true 65mph the engine is spinning at more like 4200rpm. To run this rpm for an extended amount of time (hours) on a stock ACVW engine might be pushing things a bit in terms of longivity.
Regards,
|
|
|
|
Post by centralvalleygter on Jun 28, 2010 18:03:51 GMT -5
Stock VW's actually develop their best torque between 3200-3900 rpm. Type 1 1600cc engined busses (changed to different engine type in '72) will run years @ about 65mph which with their lower gearing works out to be 3800rpm or so (if kept cool).
My 1641cc dual Kadron runs at about 3300rpm at 70mph. I checked the speed with my GPS. I am not sure whether the IRS trans has stock gearing or not, but I'm running the tallest profile 14" tires I could get (P215/75R14) on the rear which have a diameter of 25.875". I've had it up to 90mph (about 4400rpm) with room to keep going. I had the engine in my BAHA before the Bradley. The engine is 25+ years old with over 100,000 miles without a rebuild and still going strong.
The most important things about longevity with ACVW engines is oil change and valve check/adjustments every 2500 miles or so. That and making sure the oil stays cool.
Sincerely,
|
|
|
|
Post by centralvalleygter on Jun 28, 2010 11:55:19 GMT -5
Thanks jspbtown & skip20 for taking the time to give detailed explanations on the art of fiberglassing in this application. Those posts took much more than a minute or two to generate. I gave each of you a Karma for your positive contributions.
Warmest Regards,
|
|


