|
|
Post by centralvalleygter on Apr 6, 2010 13:23:07 GMT -5
I have done work on the bus in the last couple of months, but most of it is no longer visible. My brother and I completely rebuilt the chassis components - new brakes (rotors, drums, cylinders, pads, shoes, tubing, etc), new wheel & CV bearings, new tie rods, etc. However, as the picture below shows, I also cleaned up the engine a bit. 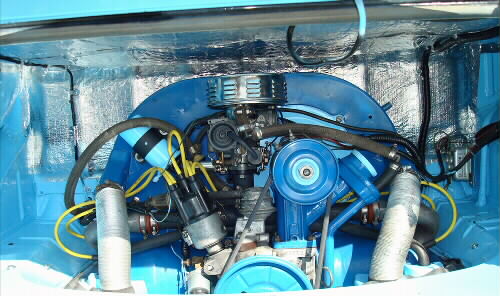 Additionally, in chasing down some electrical problems, I discovered that the fuse block was just lying on a pile of spaghetti-like wiring. Since it's stock location is difficult to get to and it uses old style fuses, I have decided to install a modern fuse assembly in a more accessible location. Below are pictures of top and bottom of the fuse block module that I have fabricated. Note the headlight and accessory relays on the right and the turn signal flasher on the left.  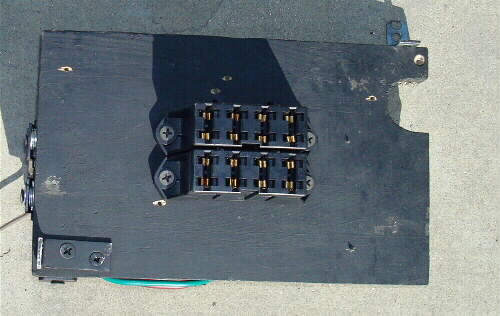 I'm sure that while I'm in the middle of disconnecting wires from the old block and installing them on this one (along with the modifications I am making), I'll wonder why I undertook doing this. Regards, |
|
|
|
Post by centralvalleygter on Mar 28, 2010 21:07:30 GMT -5
I have used basic toggle switches with great success in both my BAHA and Bradley. I also recommend that a relay be used on the headlights (generic ones can be bought at auto stores for $5 to $8). I have used the basic plastic toggle switches for the wipers, lights, fans, etc. without any problems.
Warmest Regards,
|
|
|
|
Post by centralvalleygter on Mar 23, 2010 21:17:49 GMT -5
Everything should come up like it is supposed to now - got the domain restored.
Regards,
|
|
|
|
Post by centralvalleygter on Mar 21, 2010 22:28:12 GMT -5
Just lettin' y'all know that the pictures are not coming up in my posts (nor links to my web site) due to an internal communication problem which allowed our domain to expire. Should be back online in a couple of days. It went off late Friday and our domain registration company is not open on weekends.
Warmest Regards,
|
|
|
|
Post by centralvalleygter on Mar 19, 2010 10:30:03 GMT -5
SC & MS - End of the Road,
While the magnetic strips work well below 45mph, no matter what additional alterations I make (I added a lexan stiffner with dowels and a latch at the bottom), it still breaks seal at higher speeds. With the additional attachments the whole window doesn't flap in the breeze, but it just doesn't stay sealed.
I could, of course make more attachment points with snaps or dowels or latches, but pretty soon I'd be spending 15 minutes sealing myself in every time I drove the car in the winter. Just not practical. On to other solutions.
Regards,
|
|
|
|
Post by centralvalleygter on Mar 18, 2010 20:08:42 GMT -5
I agree with mj. The VW engine has some idiosyncrasies (adjust those valves every 2000 miles!), but they are amaziningly versatile and enduring. You can get just about every part in the engine as an aftermarket part cheaper than the original parts were new (some of those parts are even better quality, other parts - not so much). You can keep it close to the stock 50hp or build it up to 300-400hp. HOWEVER, going much over 180hp and you definitely get diminishing returns in terms of dependability (read things break alot - more in terms of the transaxle, etc., rather than the engine). But, according to what I've read you can get vette-like performance out of a Bradley (12 sec 1/4 mile) with that 150-180 hp.
The versatility and parts availability on the VW engine are pretty hard to beat.
Regards,
|
|
|
|
Post by centralvalleygter on Mar 18, 2010 14:31:24 GMT -5
I also recall someone saying that they had some original and updated decals. I also know that skip20 does graphics and put quite a bit of effort in the Bradley logo (cleaned it up and put it in his computer so he could make various products), you might contact him with your needs.
Best Regards,
|
|
|
|
Post by centralvalleygter on Mar 4, 2010 14:24:18 GMT -5
It has been cold and rainy a lot here lately (actually way more than normal, especially in recent years in Central California- but it is good, we need it), so I have had quite a bit of experience with the soft window thing. I gotta tell ya, I'm pretty happy with it. All my traveling lately has been in town (less than 45mph) so I haven't had to deal with the stronger security yet, but it sure does a good job of sealing out the wind and rain. The magnetic strips align themselves pretty well on their own, just get the edges close and snap. I'm pretty sure I will be using some variation of this long term. Below is a picture of the passenger side. The window is a bit looser than it normally is because I took the picture on one of the few afternoons it cleared and warmed up. It tightens back up when cooler- which of course is when I use it.  |
|
|
|
Post by centralvalleygter on Feb 23, 2010 23:13:39 GMT -5
Well, I got to drive the car with the window experiment. It seemed to work excellently. Really seals out the wind and rain. Unfortunately, the magnets are only stable to about 45 mph. Actually, they held until 65+, but at that speed any disturbance (like a truck going by) causes the magnets to peel off. So, I will need to provide additional support at the bottom. I'll keep you posted on my experiment.
|
|
|
|
Post by centralvalleygter on Feb 23, 2010 0:13:54 GMT -5
As a lot of you know, I fabricated a door side window system (if you are not familiar with it and are curious you can click on the following link - www.swrnet.life/bradley/list14.html ). However, I now consider that an experiment. While I am completely pleased with the rear window cowl, I've been dissatisfied with the doors since I finished them. Both in terms of concept and "fit & finish". The issue for me is that I generally want to drive without the door/windows - but need to have the enclosure available if it starts to rain, or is just too cold. You really cannot carry the plexi-doors in/on the car. Sooooo, something closer to a convertible solution is required. I've been thinking that if the windows were flexible, the tops could be hard and still be stowed in or on the car somewhere. Clear shower curtains are fairly cheap and could work. I thought about fastening it to the edges with velcro, but repeated attaching and detaching eventually shreds the carpet side. Then I thought maybe magnetic strips would work. It turns out that Home Depot has 10' foot rolls of 1/2" wide flexible magnetic strip for less than $5.00, and as long as you observe the polarity the strip will stick to itself with surprising force. The following diagram shows the installation. Note that the leading edge of the window tucks behind the permanent edge and the top edge tucks under the hard edge of the top, the bottom and rear sit on top of the permenent edges. I'm currently using my top, but if it works well, I'll likely buy a half door from Ray. I'll post a pic when I get a chance. 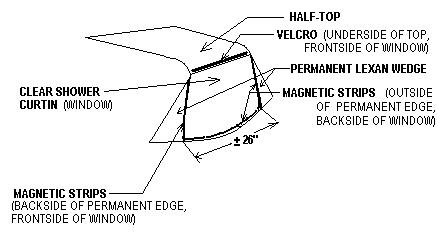 |
|
|
|
Post by centralvalleygter on Feb 20, 2010 22:32:04 GMT -5
I put a rather modest stereo in mine, but have a big speaker box behind the seats. I had the box and decided that the space was pretty well inaccessible with the roll bar and high seat backs anyway, so I put it in. The following link has a couple of pictures of the installation. www.kcsnet.com/~stevenr/bradley/list12.html |
|
|
|
Post by centralvalleygter on Jan 25, 2010 10:53:42 GMT -5
Gary,
I thank you for your willingness to do the footwork for me. You are truly an unselfish gentleman. The information is much appreciated.
Warmest Regards,
|
|
|
|
Post by centralvalleygter on Jan 24, 2010 1:14:21 GMT -5
Thanks Gary,
Do you know which one? (i.e. the colapsed and extended lengths).
Thanks again!
|
|
|
|
Post by centralvalleygter on Jan 23, 2010 21:21:36 GMT -5
It seems like I remember someone posting where a door prop similar to what was orginally supplied with the Bradley kit could be obtained. I think it was at the old site. At any rate if anyone knows a source and could let me know, I'd appreciate it.
Thanks!
Steven
|
|
|
|
Post by centralvalleygter on Dec 14, 2009 23:48:34 GMT -5
Thanks for the comments. Actually, the sliding door seems to work better than all the other doors and hatches. It looks like it had a pretty good smack on the front drivers side at one time, so the driver's door does not have as good alignment as it could. After doing inside, I'll start strategizing about doing the exterior. Working my way back, now, but still have some details to do in the cab area (new turn signal switch, wire brush & paint defroster trim plates, new visors, some detailing on the post and jambs, etc.).
My supply of funds from selling the BAHA and trailer are running out, so improvements will likely come slower for a while. Also, got it in the shop to completely go through the chassie & brakes - gotta deal with safety and logivity as well as asthetics you know.
|
|
|
|
Post by centralvalleygter on Dec 14, 2009 15:44:35 GMT -5
|
|
|
|
Post by centralvalleygter on Dec 13, 2009 22:23:59 GMT -5
Hey lilhack69,
It looks like someone has already done some extensive body work on your Bradley. The headlights have been relocated and the real window area has been configured with Farrari wings. It's hard to tell the quality of the work from the pictures, but potentially you've got the makings of a great Bradley.
|
|
|
|
Post by centralvalleygter on Dec 3, 2009 1:07:39 GMT -5
Hey Chris,
We never did make that connection you said we might make as you came to LNAS from time to time. If you ever make it back to the valley, look me up. Ditto on appreciation for your service for us.
Hey Jeff,
Will your time be flexible at the Model Airplane show? I'm off that week and depending on how things work out might try to head down to the show. If it works out I may give you a call.
Warmest Regards,
|
|
|
|
Post by centralvalleygter on Dec 3, 2009 1:01:57 GMT -5
I have a 1640 with dual Kadrons (mild cam, etc.) and seem to get 21mpg no matter how I drive. That's the same as I got with the same engine in the BAHA. Come to think of it, that seems to be the same as I get in my V6 automatic Ford Ranger pickup and the newly acquired VW bus. Maybe my calculator is stuck or something!!!  ?!!! |
|
|
|
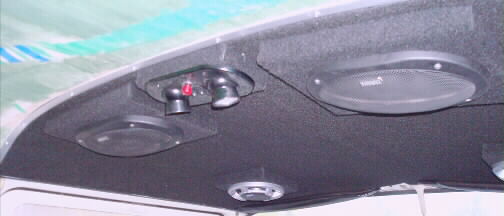
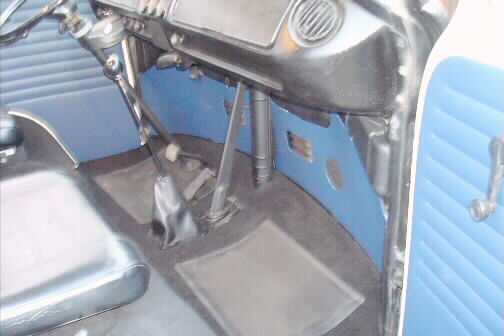
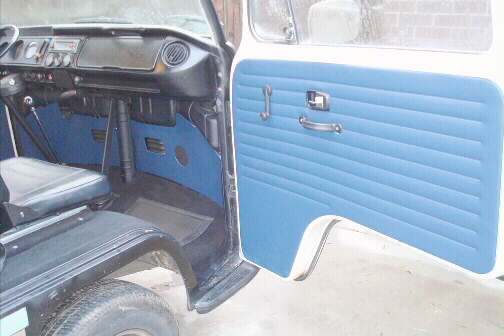
Post by centralvalleygter on Nov 26, 2009 22:15:39 GMT -5
Couple of more pictures, showing later restoration work. The updated dashboard. It had gashes and cracks in it. Also, note the new gauges below the radio. 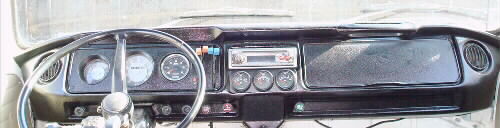 The headliner. The blank standoff between the rear two speakers is for a future aircraft style dome light. 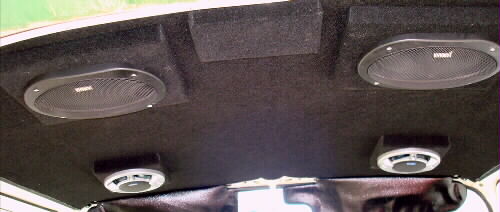 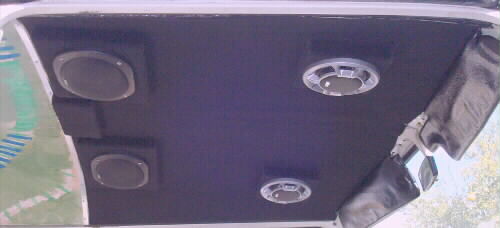 The following pictures show the finishing of the cab floor. I repaired the rusted out area, lined it with foil backed insulation and carpeted it. The first picture shows carpet complete on the driver's side, but insulation only on the passenger side. The second picture shows the completed carpeting. I will be putting on boots/trim pieces around the shifter and emergency brake. Kick and door panels have been ordered and should be arrive in about a week. 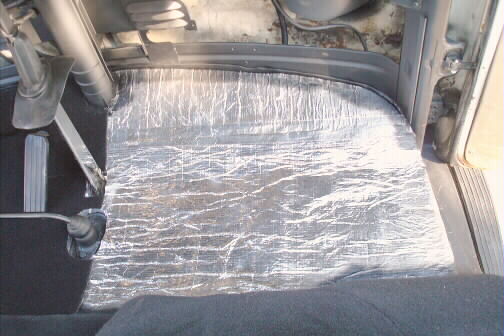 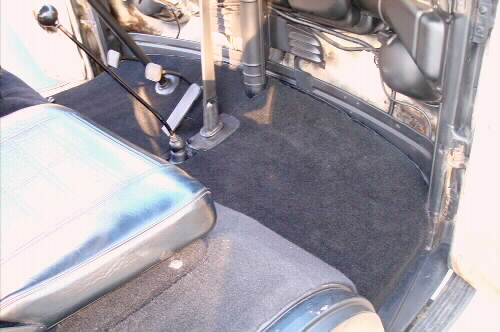 |
|
|
|
Post by centralvalleygter on Nov 25, 2009 21:58:42 GMT -5
Hi All, I haven't posted lately, but I have been checking the board out periodically. I did get the disc brakes swapped from the Baha to the Bradley, so I'm pretty well done, except for tweaking (and finding a better door solution). So, what do you get when you cross a Baha bug with a trailer? A VW camper bus! We weren't using the trailer much (once every 3 years or so) and I'm selling the Baha - so we needed a spare vehicle. My wife said if I sold the trailer, she wanted a something that we could sleep in if the house burned down or something. So the solution was a VW Bus. I got a 1971 cuz it was the last year they used an upright VW engine (dual port 1600cc) and first year with disc brakes. The engine is fresh and the chassie is solid, but the rest needs work. So I'm starting the restoration process. Below are some pictures of the bus. The first is the outside. 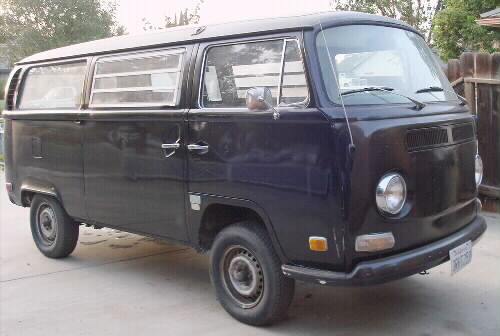 The second is some of the interior stuff I removed. 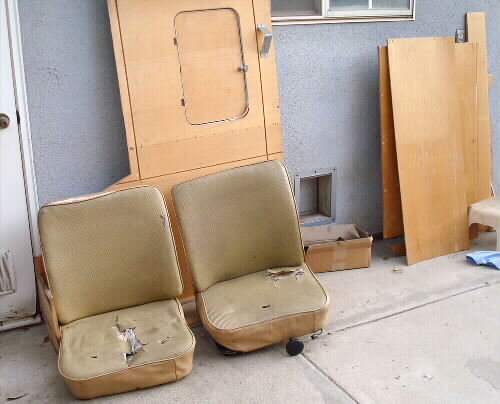 The third and fourth show my initial work - new seats (actually tractor seats - much cheaper than fixing or replacing stock ones), carpeting the wheel wells and replacing the seat belts. 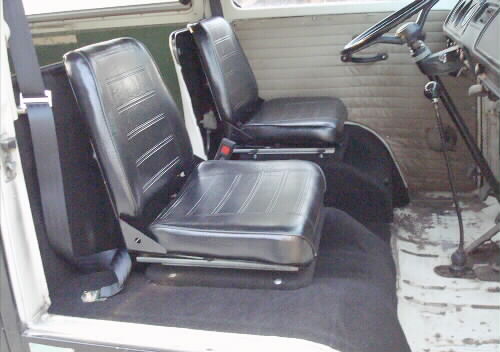 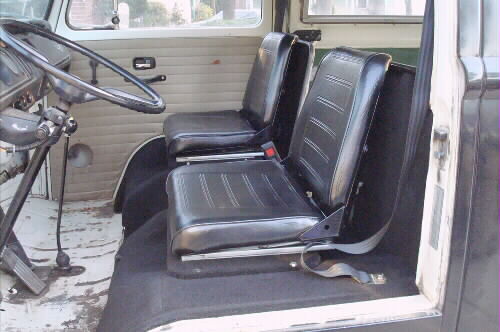 Since these pictures I have redone the dash board (added gauges, filled holes, etc.) and replaced the headliner in the driver's area. Floor repair and carpet is next. Until next time.... |
|
|
|
Post by centralvalleygter on Oct 9, 2009 20:43:26 GMT -5
Brian,
I'll take the front bumpers. If you'll determine an approximate shipping cost (I'm in Lemoore, CA - 93245) and provide an address, I'll forward a check. My email address is on my profile page or obtainable from my website. Thanks!
|
|
|
|
Post by centralvalleygter on Sept 19, 2009 21:59:41 GMT -5
Brian,
Do you have front bumpers for GT 1? If so, let me know what you want for them. Thanks!
Warmest Regards....
|
|
|
|
Post by centralvalleygter on Sept 19, 2009 21:57:00 GMT -5
I can't remember if anyone every discussed this before, but because I periodically need to take a passenger and my catalog case, etc., I needed a luggage rack. A bit of research and measuring made me confident enough to get one made for a covette from www.zip-corvette.com, model X-668. It is a six bolt unit that completely mounts from the top (have to drill six 1/2" holes). But, it does fit well and look nice. If anyone is interested, I'll post a picture later. Regards |
|
|
|
Post by centralvalleygter on Sept 5, 2009 19:51:33 GMT -5
|
|
|
|
Post by centralvalleygter on Aug 27, 2009 9:33:25 GMT -5
In California Bradleys are supposed to be registered as "Specially Constructed Vehicles" (SPCN), so that's how mine is registered. I have it insured with State Farm, they show the make as VW and the model as a Bradley GT on my insurance card.
Sincerely.....
|
|
|
|
Post by centralvalleygter on Aug 26, 2009 11:22:39 GMT -5
One last thing you must remember when wiring a Bradley (or any Fiberglass bodied car) is that you must run ground wires to anything mounted in the body that depends on the mounting for the ground. This may be an issue for tail lights, stereo system, fuel level sender, some of the guages, etc. The guage of the ground wire should be the same as the positive wire, as it carries the same current. Most wiring harnesses do not provide for this, so expect to have to have additional wire and end connectors on hand.
Regards,
|
|
|
|
Post by centralvalleygter on Aug 24, 2009 21:14:30 GMT -5
Yes mine is set about 2 inches back from the front lip of the top of the door opening. I actually like it that way as the gas lifts fold down right behind it when the doors are closed (I have to use doors as mine is a daily driver and regardless of the fact that it is called sunny California, it does rain in the winter here).   Sincerely.... |
|
|
|
Post by centralvalleygter on Aug 24, 2009 12:36:27 GMT -5
It looks like your fabricator did not have a small enough radius plug on his tubing bender for the front one. I think it is just a matter of getting used to it, as long as your doors will clear if you decide to use them. Funny you should talk about the fact that the chassis is more rigid, I guess I did not think about that since I have not ridden/driven in a Bradley without the full cage. I do know mine feels very solid. Guess I been spoiled and not really known it. The cage in mine is well built/shaped, the only problem is the way it is contructed, the body is never coming off without taking a saw or torch to the roll bar system.   Best Regards |
|
|
|
Post by centralvalleygter on Aug 20, 2009 22:47:42 GMT -5
The original Bradley GT was made from 71-79 with relatively minor changes. The GT2 like yours were only manufactured in the years 77,78 & 79. No one has yet figured out a relationship between the serial numbers on the bodies and the year of the car, so it is difficult to determine exact years, though there might be a few people who could tell you better from some of the slight changes made from year to year. The following site especially for GT2 owners has some scanned manual info and electrical schematics. www.bradleygt2.com/man/toc.php3I believe Jeff Troy has a CD for the GT2, though not as complete as the one for the GT1, I think it does have the complete manual on it. Check out the following link. www.bradleygt.com/manuals_page2.htmRegards.... Hope this is helpful! Regards.... |
|

 ?!!!
?!!!