|
|
Post by centralvalleygter on Aug 20, 2009 17:07:34 GMT -5
Welcome to the Bradley board, lots of people willing to share their experience here. It does look like you got a great deal.
Because Bradleys are rear engined, the back end wants to make the car spin under hard corning. Putting a heavy v-8 out back would make it much worse. If you are serious about a v-8, you need to make it mid-engine (like Skip20 is doing) or it will be a monster to do anything with except go straight.
Air Cooled VW engines are wonderfully versatile. You can build them to make 150-200hp and still be quite dependable (either normally aspirated or with turbo). Relatively speaking, they are cheap to build (I recently rebuilt a stock one with new crank, align bore, barrels, pistons, rods, bearings, etc. for less than $600, not many engines around that you can do it for that) and parts availability is amazing for their age. With the weight of Bradleys that amount of power results in vette-like performance.
CB performance, Bergman, A.J. Simms, etc. can build you a motor, like that, but it will cost $3000-$5000. Buying kits and putting it together yourself can shave about a third. You can actually get much more power out of them, but low-maintenance dependability is no longer a characteristic. You also then have broken trannys and axles, etc. to contend with.
If you are topping out at 80mph, you must have a tired single port engine and small diameter rear tires. I don't know about GT2's, but I've heard the GT1's start to front float at about 90mph, however, I've been close to that speed with no noticeable effects.
Lastly, protect your windshield all you can, they are custom and harder than hen's teeth to find replacements. People are starting to resort to modifying the frame to accept other car glass.
Take care....
|
|
|
|
CD
Aug 1, 2009 22:29:28 GMT -5
Post by centralvalleygter on Aug 1, 2009 22:29:28 GMT -5
Jeff Troy bought and built a GT1 when they were available from the manufacturer. He also rebuilt/restored it several times since. Lucky for us he has a passion to document what he does. He composed a CD which has lots of pictures of his car during the various builds as well as finished cars of others and lots of other helpful info like scans of the original assembly manual. Well worth the cost. Just send Jeff a private message and he will give you details on how to buy it. Oh, I just checked you can still get to the page on the original Bradley site that has info on it, just click on the link below: www.bradleygt.com/manuals.htm |
|
|
|
Post by centralvalleygter on Aug 1, 2009 22:22:14 GMT -5
The side windows on the GT1 are really the doors. They were unavailable for a long period of time which led people to try to manufacture them, but none did with enough confidence to sell them. Within the last year the original company who was subcontracted by Bradley to make them started reselling them (and the rear windows) again. However, they are a bit pricey and even more prone to breakage than the originals (made of slightly thinner stock). If you find someone who will reproduce them in Lexan, I think that would be better. Lexan is far less brittle, but easier to scratch and should have a film on the sun exposed side to protect it from the uv rays.
|
|
|
|
Post by centralvalleygter on Jul 29, 2009 12:24:21 GMT -5
Instead of mounting/setting a channel, you might make a short(1/2" to 3/4") fiberglass lip at the proper angle and alignment at the base to facilite using a generic window mounting gasket, such as: www.jcwhitney.com/autoparts/Search?catalogId=10101&storeId=10101&sku=HW812557It also depends on how you are attaching the window to the cowl you are building on the other three sides (I used the gasket all the way around to mount my window). Just a thought. |
|
|
|
Post by centralvalleygter on Jul 24, 2009 14:56:52 GMT -5
Hello again Bob,
I'm not really the body man expert, but my brother has done quite a bit of body and paint work on the side, so I've picked up a bit. Bondo is okay when used for what it is intended - to fill in minor imperfections, indentations, etc. If you start getting more than a half-inch in thickness, there is a better, more enduring way to do the repair. Also, since it has no tension component, it is not good for filling in holes that go all the way through the body (you'll just get pills dropping out of the holes). Besides, holes are much easier to fix in fg than steel, so there is no reason to even consider it for that.
Interestingly enough, Bondo is really better on fiberglass than steel as it uses basically the same resin/hardener as fg. That makes is so it expands and contracts about the same as fg and therefore has less chance of cracking, etc as well as adhering better. The expansion/contraction will eventually show up when thickly used on steel. One last item, if you want to thin the Bondo for filling in pin-holes and very minor imperfections, you can add a little fiberglass resin. A little bit of experimenting and you'll find just the right consistency for most any work. Lastly, remember to not mix too much Bondo at once, it cures pretty quickly and its a shame to throw out more than you use.
Warmest,
Steven
|
|
|
|
Post by centralvalleygter on Jul 24, 2009 10:28:26 GMT -5
Mine came with aftermarket mirrors with LED turn signals built into them. I like the basic design, being out further from the body makes it so I can see with them very well. Well, at least now I can, I had to move them forward nine inches from where they are shown here because windshield post was smack dab in the middle of the one on the passinger side. Either the orignial builder just put them where he thought they looked good or when I moved the seat forward it changed the view lines. I like them, EXCEPT they are out of adjusting reach from inside the car. If I could find similar electric adjustable ones for a reasonable price I would replace them in a minute.  Regards, Steven |
|
|
|
Post by centralvalleygter on Jul 24, 2009 10:15:50 GMT -5
Bob,
I really like the way you come up with elegant solutions to those nagging "just not quite right" ways that some of things were done on the original Bradley GT design. Your web site reflects that same philosophy, simple and clean, but very effective in communicating what you are doing. I gave ya a karma for good work!
BTW, I think I see a tennis ball basket in the background. Are you the tennis player or someone else in your family? If you, how did you start? How long have you played? Do you still play consistently?
Warmest Regards,
Steven
|
|
|
|
Post by centralvalleygter on Jul 17, 2009 19:01:10 GMT -5
The only way I justify my toys, like the Bradley, is if I use them routinely. I have had things I used once or twice a year and began to feel like they owned me and not me them when I had to maintain them.
At any rate, the point is my Bradley is driven pretty much everyday, so my rather small community should be used to seeing it. Most of the time I notice people taking extended looks but not saying much. However, I've found if one person actually talks to me about it, then that day wherever I go people are going to stop and ask about the car (like 4 to 5). This seems to take place if I go to three different towns that day or just stay within a mile from home. If one talks to me I know I'll be talking to several that day. It happens about every three weeks. I really think the moon controls whether people decide to actually inquire, or just look. Oh well, it's part of the fun.
|
|
|
|
Post by centralvalleygter on Jul 17, 2009 18:30:11 GMT -5
It is a single electronic gauge panel from Nordskog. They started making boat gauges then moved into auto gages. They also make individual gauges and there are different color LED's available (Green, Red, Blue, Amber). I had it in my BAHA bug for several years and transplanted it into the Bradley. You can get them directly from the mfg, but sometimes they are cheaper from Summit Racing Products. The panel was not cheap, but I found it cheaper than getting individual gauges and it certainly is convenient (and I think it looks good). Sources: nordskogperformance.net/product.php?productid=18582&cat=10&page=2www.summitracing.com/search/brand/Nordskog/?page=1The water temperature sender works find for oil, but you do have to change the label on the gauge (I did it on computer, xeroxing onto transparency) |
|
|
|
Post by centralvalleygter on Jul 16, 2009 22:26:02 GMT -5
Yes, the pictures do have to exist on a server somewhere else (your own website, photobucket, etc.). To have it show up on the site you can either click on the image icon and enter the address to the picture between the ![]() [/img ] flags or actually type in the tags. (Note I put in spaces after the "g" so the board wouldn't try to post an image). |
|
|
|
Post by centralvalleygter on Jul 16, 2009 21:14:21 GMT -5
Well, as I said in the first post I wanted to redo the dashboard. My first effort protruded more than 4" into the driver's area (can't use the word c***pit on this board, it turns into thingypit), which precluded the use of a standard shift lever. The new one is only 1.75" deep at the bottom. I also put an extended top to aid in viewing in bright sunlight. Below are various pictures of the new dash. You can see more on my web site. 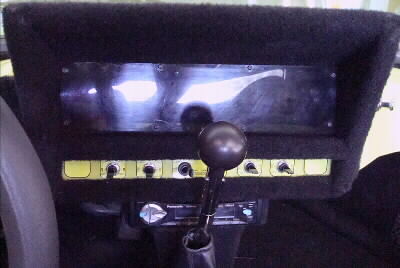 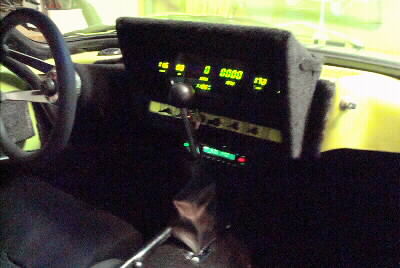 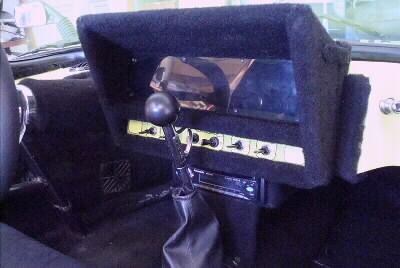 =================================================== I also recently replaced the double sealed beam headlights with a single rectangular Halogen light. Much better light & uses less current. I'll post full front pictures later. I didn't feel like pulling it out of the garage, and kinda want to wait until I fashion a front bumper for it.  |
|
|
|
Post by centralvalleygter on Jul 2, 2009 10:29:42 GMT -5
Hey Mike,
I agree the graphics and seat covers look good. Getting a roll cage installed is a good idea. I'm very glad I've got one in mine as the FG top would offer no protection in the event of a rollover. I bolted my FG top to the center roll cage members, which makes for a very solid vibration free connection. It also provides solid place to mount the door support. My cage also has side bars which at least gives me the illusion of protection from a side swipe.
Be sure and post some more pics when you get the side panels and roll cage in. Again, lookin' good.
Warmest Regards,
Steven
|
|
|
|
Post by centralvalleygter on Jun 29, 2009 0:17:46 GMT -5
I did get the front wheels wells done. Well really just mud flaps as I did not put in full enclosures. For whatever reason, my Bradley did not have the stiffeners in the side tunnels (a pipe from the roll cage extends out and reinforces the outer wall), so my front tires throws pebbles, etc. down the tunnel when I drive down the road. Below is sequence on how I constructed them. First I put glued on wood mounting lips. 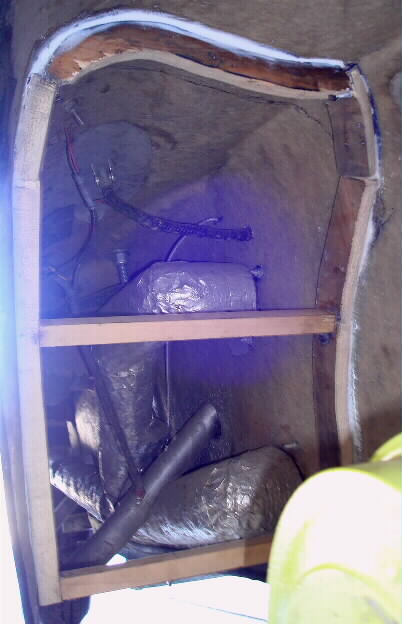 Then I fiberglassed them to the body.  Then I drew and cutout a panel from leftover vinyl shower enclosure material. 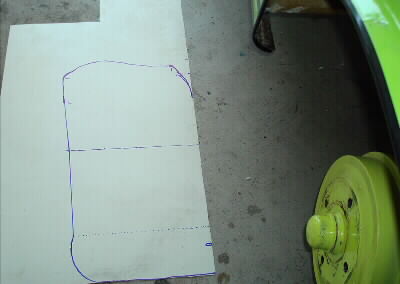 Here the panel is mounted.  Lastly, the panel has been sprayed with rubberized undercoating. 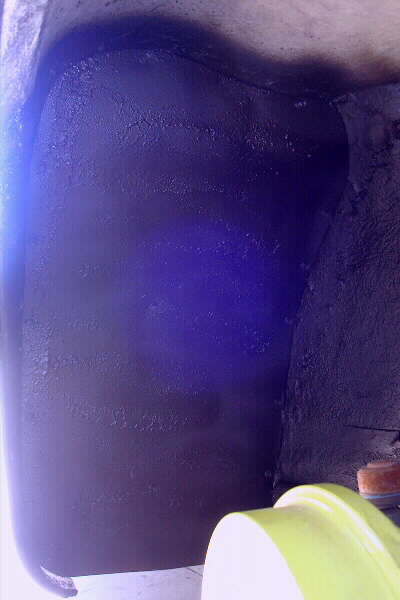 |
|
|
|
Post by centralvalleygter on Jun 25, 2009 14:58:45 GMT -5
Apparently, between the fear of the virus, spam bots and general busy-ness there is not much activity on the board(s). Don't expect that this string will garner lots response post, but maybe it will seed some activity. Some things I've done since my last post.
1. Replaced dbl round headlights with new single rectangular Halogens. Create much better visibility and uses less current.
2. Change back to slotted aluminum wheels. The 15" were rubbing on the front fender lips when I turned. Also, I needed to get new rear tires as mine were getting bald. The aluminum wheels are 14" (which still fit over the disk brakes) and have low profile tires. Solves rubbing and corners better. I had hoped to find some 15" x 7" that matched the front ones for the rear because I could put 28" diameter tires that allowed me to cruise at 3100-3200 rpm when going 70mph. I didn't find 15", but did find some 14" x 7" which matched well. The highest profile tires I could get provide about 26.75" diameter which gives me 70 mph at about 3300-3400 rpm. I had to do some work to mount the center caps, but overall I'm pretty happy with the new setup.
3. Did some general maintenance and cleanup on previous work.
4. Rebuilt the windshield wiper assembly (down to bear metal, repainted, replaced bushings, shafts, etc.) Also made new wiper arms that use stock VW mounting system. The Universal arms on it did not stay on well and were a general hassle.
Things I hope to do this summer include:
1. Make/mount a front bumper
2. Make some wheel wells for the front
3. Revise my dashboard to allow use of aftermarket short throw shifters (I got carried away and made it protrude into the interior so much that it interferes with a regular shaped shifter. The one that came on it was stock but had been reshaped to move the reach rearward )
4. Transfer disc brakes from the BAHA to the Bradley
5. Possibly take another shot at making doors with metal frames (The ones I made with a wood frames are not holding up as well as they should and I've never been happy with the fit and finish).
So there you have it.... the latest chapter on me and my Bradley.
Steven
|
|
|
|
Post by centralvalleygter on Aug 16, 2008 19:07:34 GMT -5
Hi All,
I signed into this board a few days ago. As of 5:00pm PST on Saturday, August 16, the virus is still on the main board. So, I guess we'll be here for a while. Take care...
Steven
|
|
