|
|
Post by horen2tas on Aug 12, 2011 10:54:31 GMT -5
From those of you that have installed one already, is it possible to to do with the body on?
I've got a GT2 that may need it. Also the throw mentioned is 4" but what about the length of the actuator body.
Any tricks to mounting?
Any wiring diags?
Also is it smarter to have separate controls for the actuator and the lights?
Thnx for any help on this
Mike Horen
|
|
|
|
Post by brianboggs on Aug 12, 2011 12:40:28 GMT -5
Linear actuator for what? There could be a hundred places to mount one to do some operation currently done manually. More info please. Doors? Headlights? Truck? Gas cap? Hood? Smoke screen guns?  ? |
|
|
|
Post by horen2tas on Aug 12, 2011 13:04:21 GMT -5
HEADLIGHTS, sorry about that,
lots of air between my ears lately!
|
|
|
|
Post by mrbigh on Aug 12, 2011 22:57:30 GMT -5
HEADLIGHTS, sorry about that, lots of air between my ears lately! a 4" linear electrical actuator is the right choice and I installed a separate DPDT switch for it's operation regardless of the hi/low beam switch. My installation was made from the top of the vehicle but crawling under the body can be made as well with less ease. I started removing all existing hardware and re-using a bracket for the actuator mounting and the existing wiring for dual action power. Could post some pictures as guidance |
|
|
|
Post by mwilson on Aug 12, 2011 23:53:32 GMT -5
If you do a search for "actuator" on this site, you'll see that quite a few of the experts have already solved this problem. I recently installed mine but used the double relay switch that jbstown has posted elsewhere. It works well. However, it is slower than what I was hoping for. I bought mine from a store on EBay (it was 1/2 the price of what others wanted), it was intended to be for a 24V setup so it's slow but it still works.
Good luck.
|
|
|
|
Post by horen2tas on Aug 13, 2011 20:57:20 GMT -5
I've already checked collected and printed the various solutions by board members, but the mounting and length of the actuator are the mystery to me several actuators that have 4" or 3.93" throw have different body lengths. As close as I can figure the mounting place has to be on the firewall next to the steering column. Not sure where that might be approachable from. I haven't checked yet but the door on top seems tighter than a turtle's a_ _! ˆguess I'll have to just get under and have a look.
|
|
|
|
Post by Dan MacMillan on Aug 14, 2011 1:02:00 GMT -5
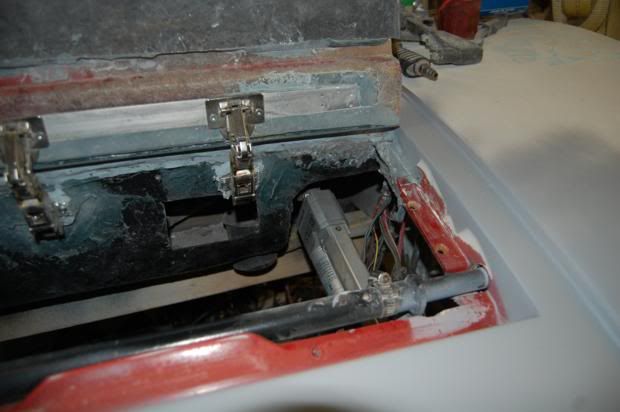
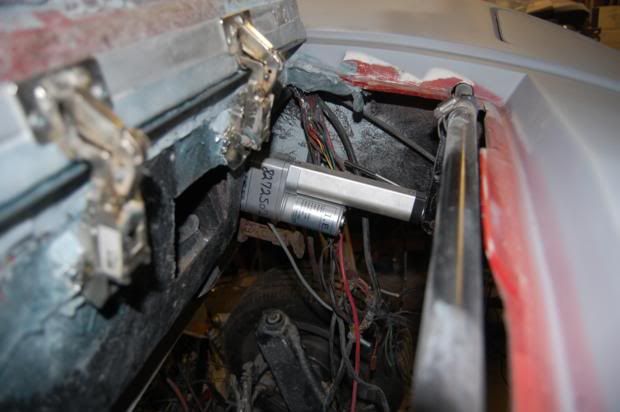
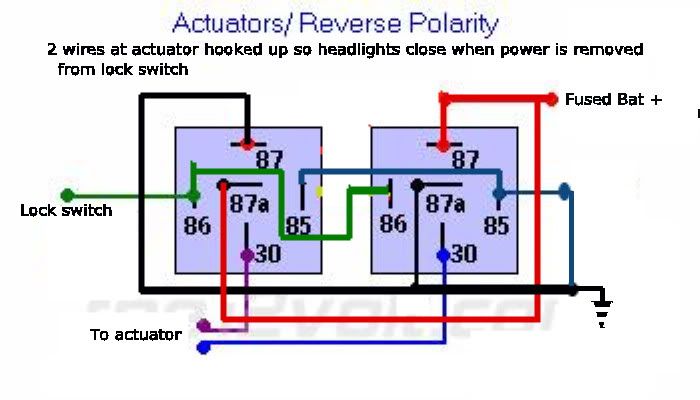
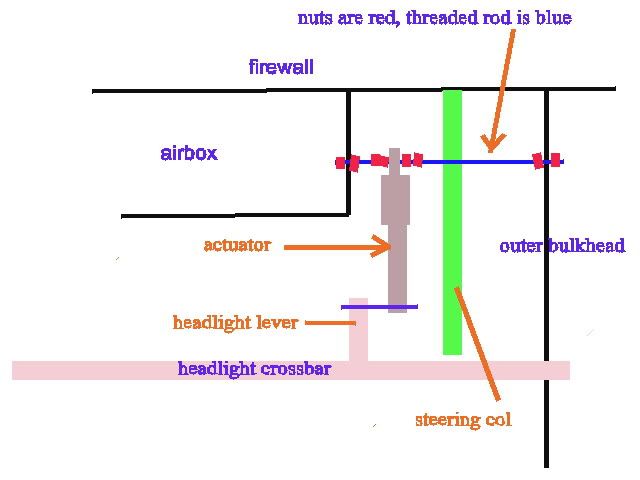
If you retain the stock headlight crossbar/lever/torsion spring you need an act with a 4" travel. On mine, with the headlights closed and the actuator retracted I mounted the shaft of the act in the stock hole in the headlight lever. I mounted the body of the act by drilling the act hole to 3/8" to accept a threaded rod. This rod goes between the air box and the outer plywood former. 8 nuts and 4 washers are on the rod. 1 nut and washer on each side of the airbox and the former to lock down the rod, 4 nuts locate the act side to side and lock it in place. They do not lock the act to the rod. The act is free to rotate around the rod.    This wiring results in the lights opening if the headlights sw is on AND the lock sw on. They will close if either sw is turned off. There is zero parasitic draw on the battery when turned off. By supplying the headlight sw with IGN controlled 12v instead of constant BATT 12v, the headlights will automatically turn on and open when the car is started {if the HL and lock switch are on} and close when the car is turned off. UPDATE: A fellow builder asked me the following:My actuator has 5 wires coming out: Red, Black, White, Purple,Yellow. Do I ignore the others and just use the red and black? Yes, you ignore the remaining 3 wires. Only the red and black are used. They are connected to the relays so that when power is removed from the "lock" wire, the headlights retract into the body. |
|
|
|
Post by horen2tas on Aug 14, 2011 21:24:57 GMT -5
How does this avoid the act from going up and down or flopping around when it's job is to push straight?
|
|
|
|
Post by Dan MacMillan on Aug 14, 2011 22:54:08 GMT -5
Does this help?  The 3/8 rod is more than strong enough to hold the act in place. |
|
|
|
Post by mwilson on Aug 14, 2011 23:55:24 GMT -5
Since you asked, my actuator is just under 10 inches long. I mounted mine to the outer bulkhead simply because the airbox is very difficult to get in and out of let alone try to tighten a nut on the inside. I used the original bracket that held the original motor, and then mounted a smaller bracket to this so the bracket would take the pressure going both ways. It ended up looking like this: __[__ Two bolts through the outer bulkhead secured it. This bracket already had a hole for the rear of the actuator to go through and be secured with a bolt and lock nut. Here's a pict from my Blog. 1.bp.blogspot.com/-QTt7QYpBPjY/Tj3ruTxEUwI/AAAAAAAAARQ/BpwIR_p-NA0/s1600/HPIM0897.JPGHowever, you can't really see the back of the bracket. Good luck. |
|
|
|
Post by horen2tas on Aug 15, 2011 11:21:14 GMT -5
My only question with what Dan suggests was what keeps the mounted end of the act from flopping up and down since it is pivotal rather than mounted.  But it seems from the diagram that I worked on that the mounting is triangulated so it's not really going anywhere, is that correct? |
|
|
|
Post by Dan MacMillan on Aug 15, 2011 18:50:18 GMT -5
The threaded rod although it spans an open space cannot move due to the strength of the rod and the short space. The 2 nuts on each side of the act are jammed together [locked] just touching the act, allowing it to rotate on the rod. The rod passes through the act. Due to the arc that the headlight lever moves in it causes the act to move in a slight arc. That is why the act can pivot on the threaded rod.
|
|
|
|
Post by horen2tas on Aug 15, 2011 23:10:57 GMT -5
Now I understand why you did that (put it on the rod so it pivots) to allow for the arc or radius movement of the lever attached to the headlights! Good on ya!
"I wondered why the hardball was getting larger....suddenly it hit me!"
Thnx Dan,
Mike
|
|