|
|
Post by bradley85 on Nov 24, 2012 19:00:47 GMT -5
If I can get the photos to post, they are pretty easy to understand. The actuator I used is a Spal LACT4P with 4" stroke, 110 lb dynamic load, 500 lb static load, and 1/2" per second speed. I am sure other units will work with linkage adjustment, etc. The mounting bracket was fabricated of 1/4" aluminum plate TIG welded to a short piece of 1/4" angle. A piece of 1" square tubing was then bolted to the aluminum to hold the "business end" of the actuator. the bracket was then bolted to the wooden bulkhead. An aluminum extension was bolted to the original operating arm and then the light buckets were clamped in the open position and a hole location was marked for the actuating ram bolt to push and pull for opening and closing. You can see that I have removed the Bradly torsion spring and hose clamps and have substituted a coil tension spring. You may be able to get by without the spring. I think it helps. There are wiring diagrams to choose from. I used the hand drawn diagram. Go for it! Greg 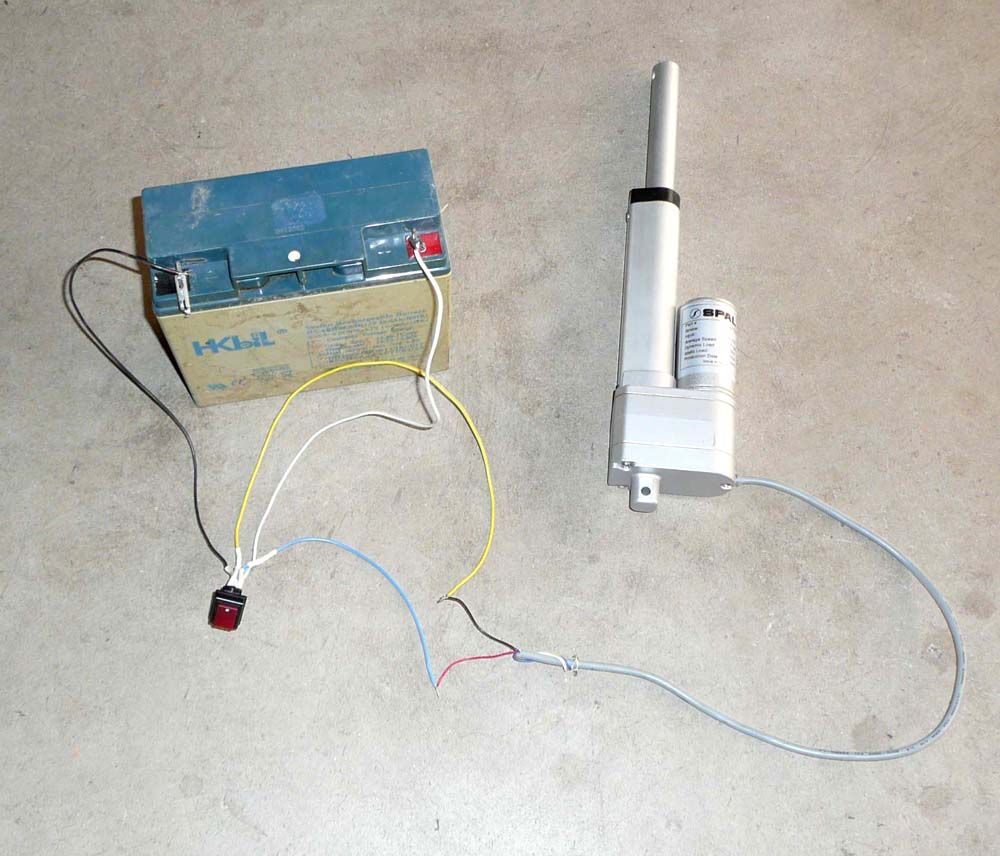 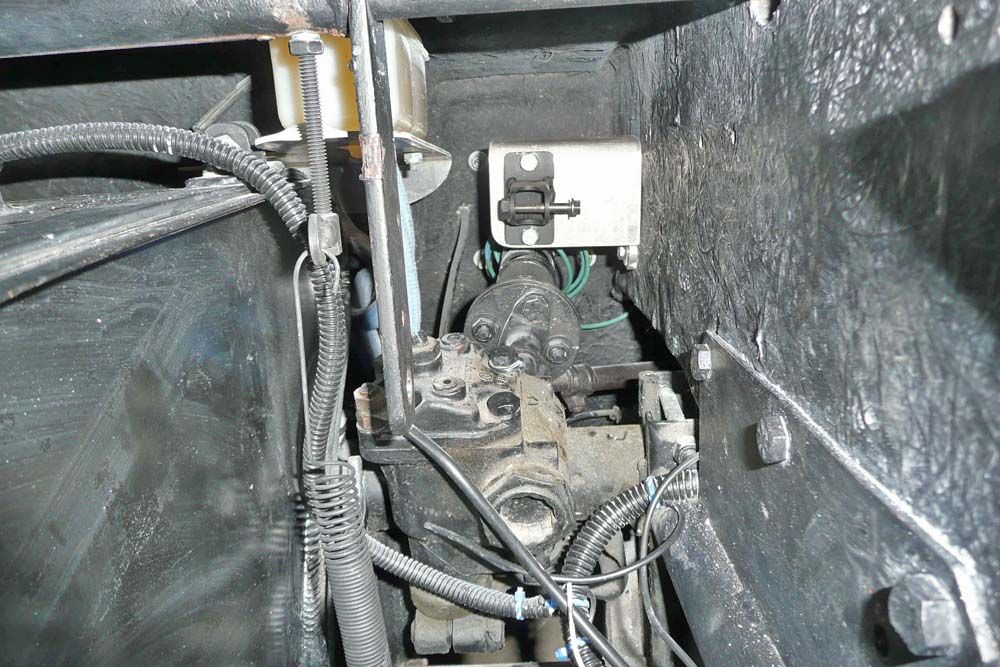 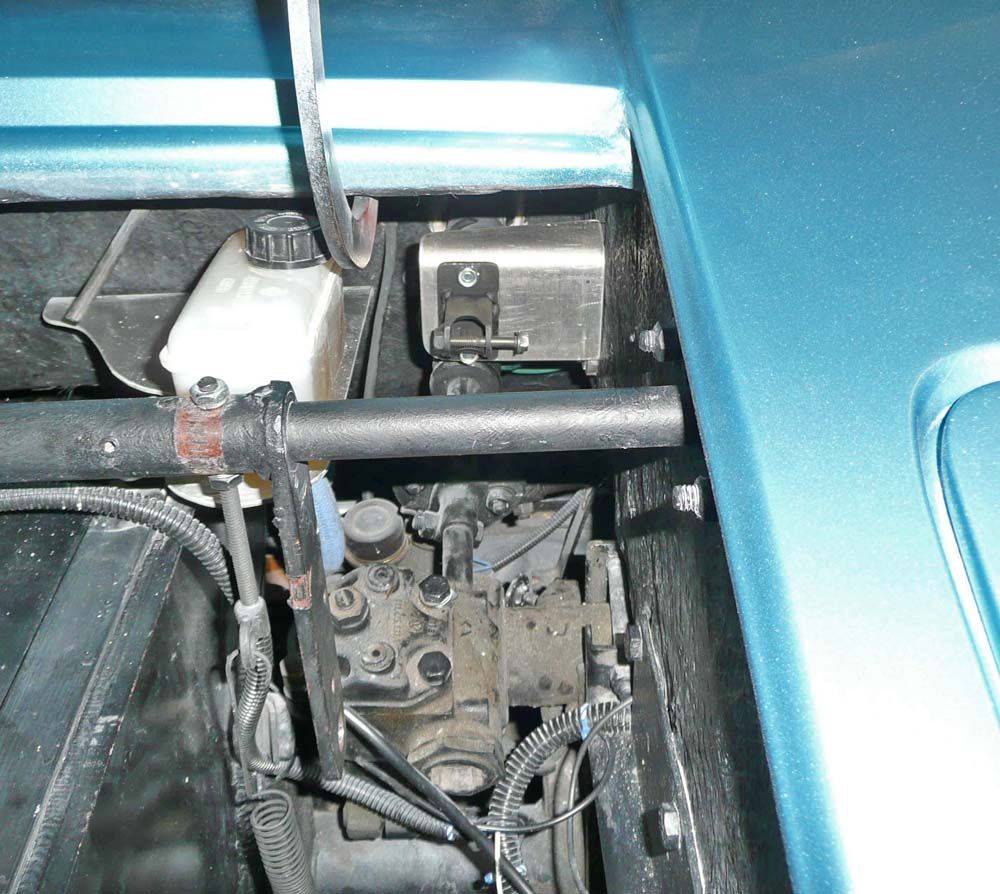 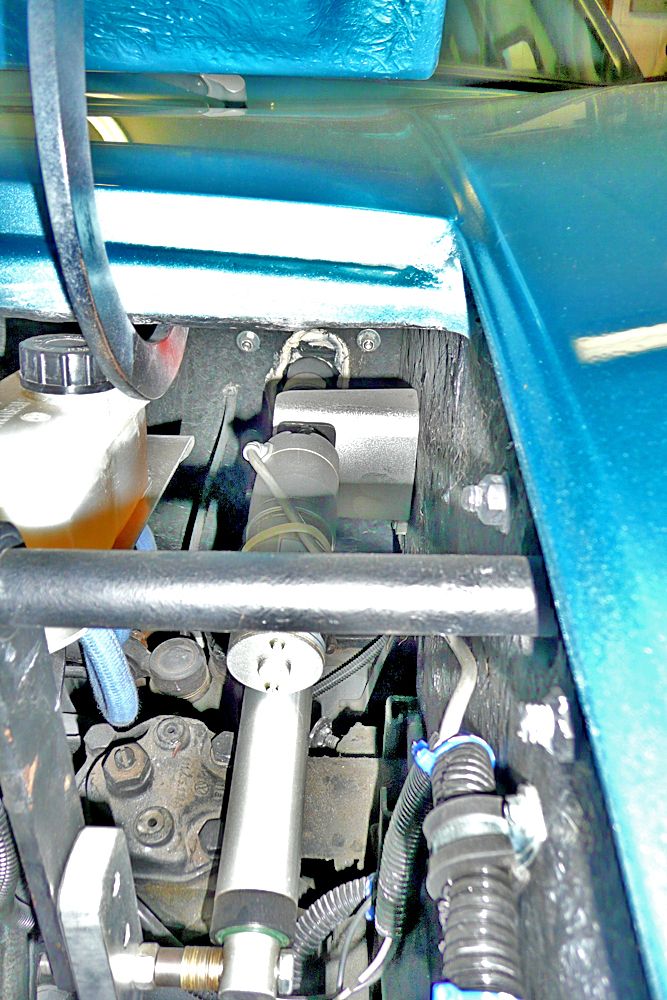 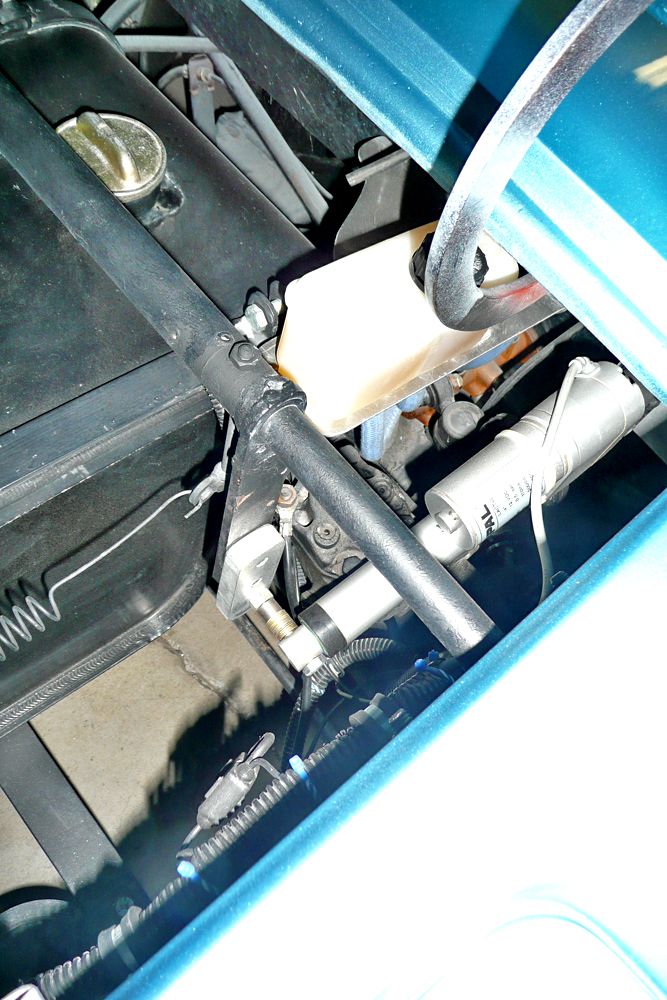 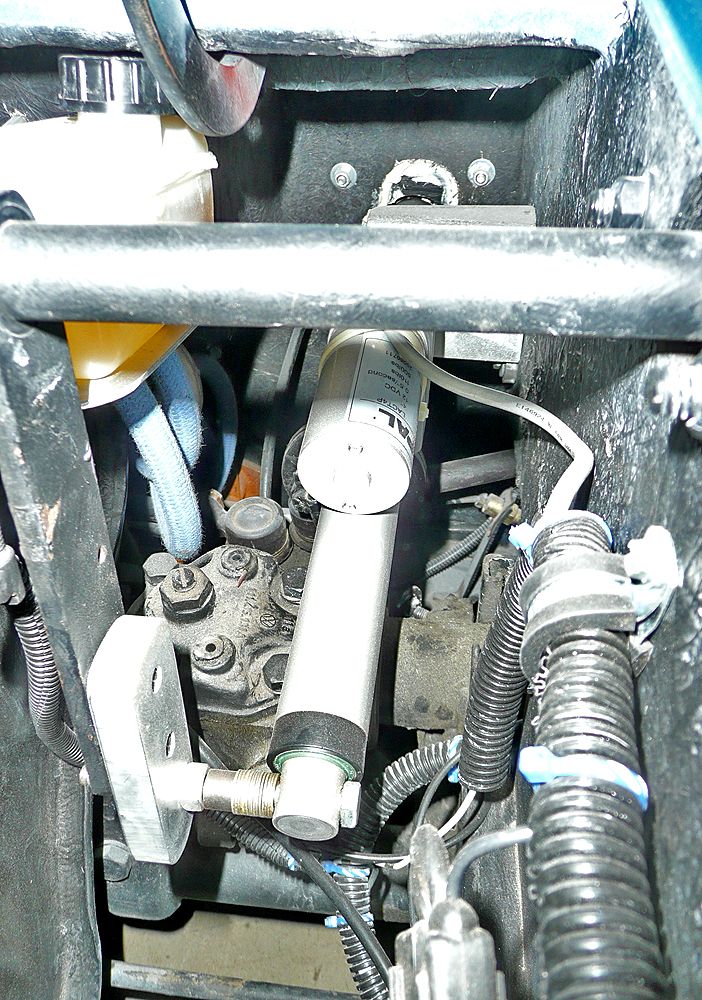 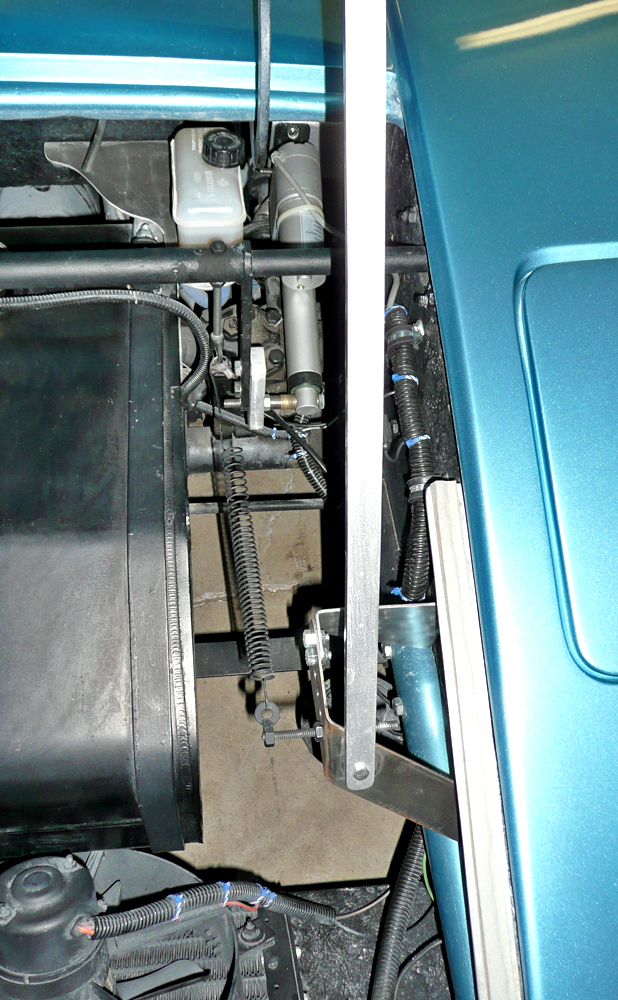 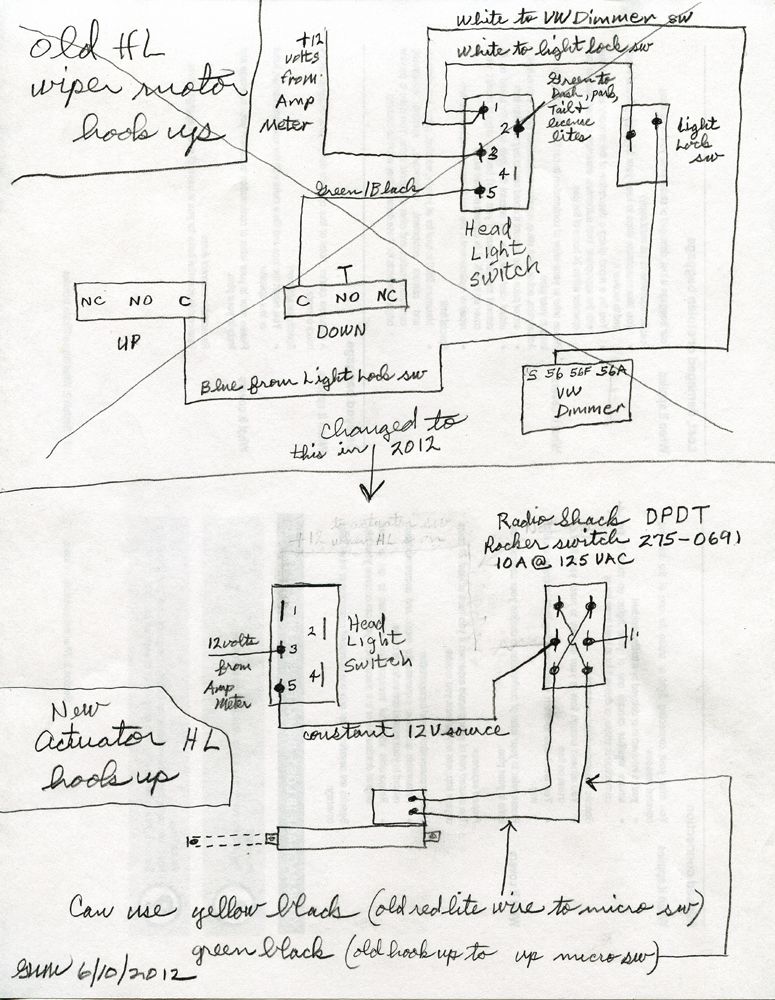 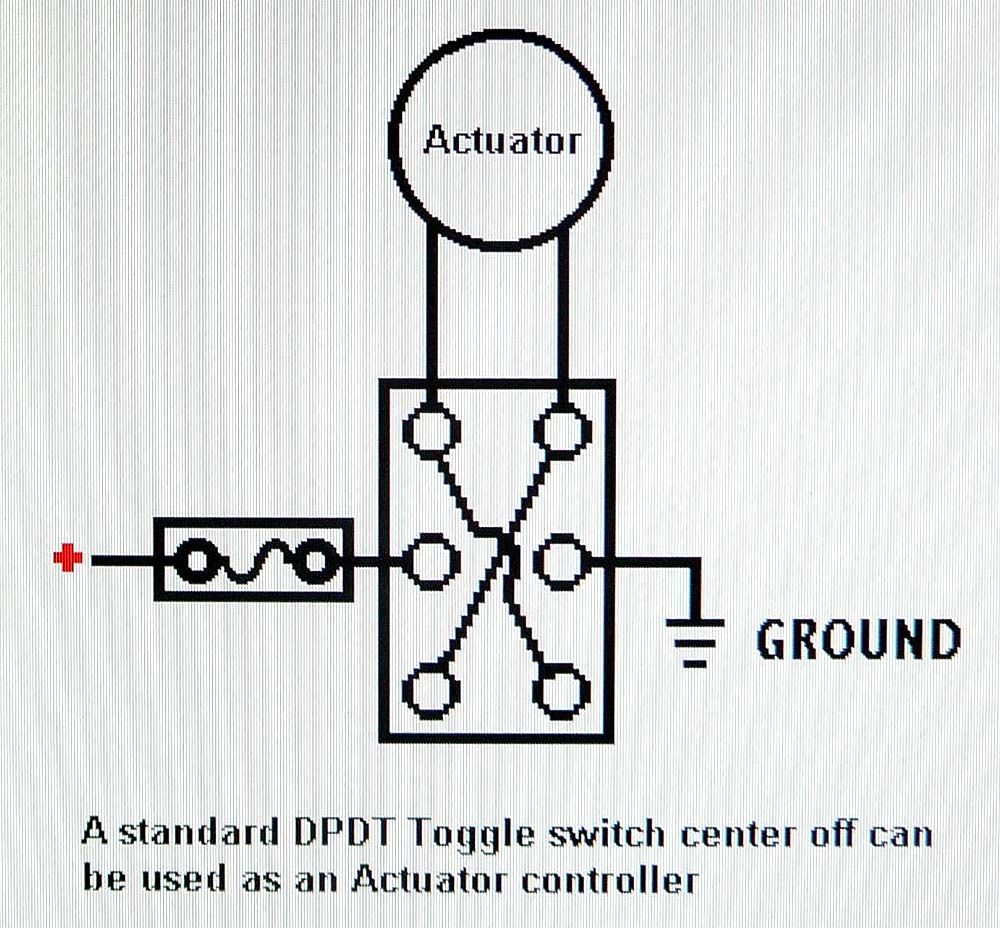 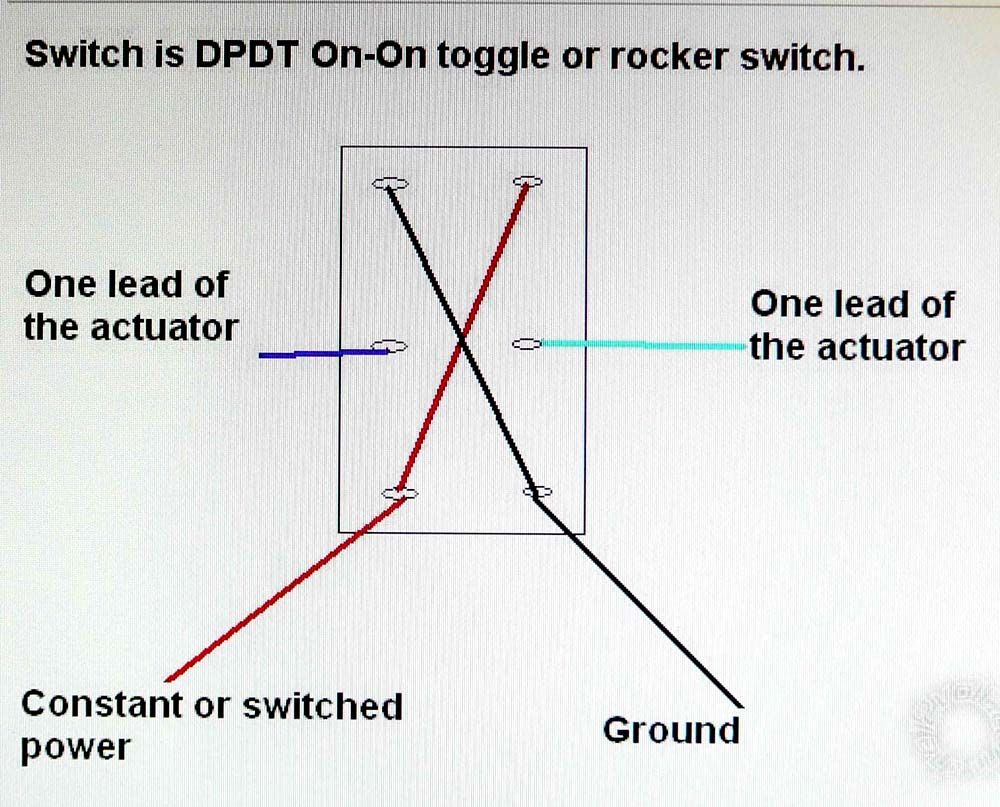 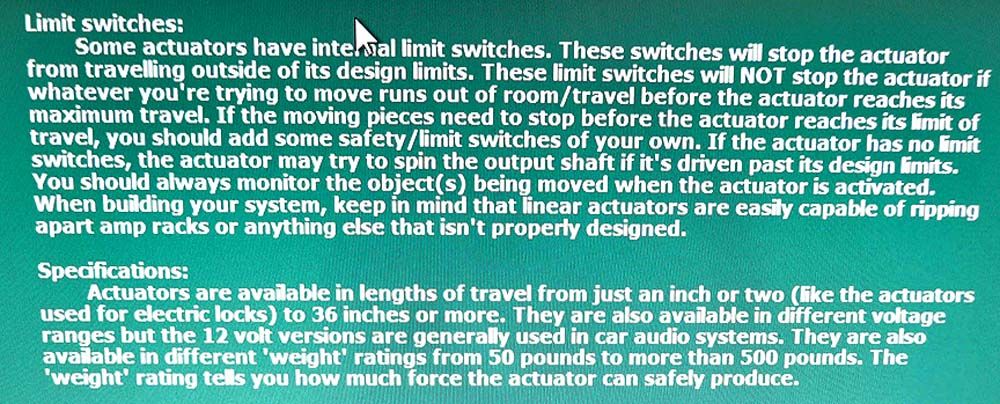  |
|
|
|
Post by horen2tas on Nov 24, 2012 22:07:35 GMT -5
Great Stuff
BIG HELP!!!!
Thanks much photos are top drawer!
|
|
|
|
Post by Dan MacMillan on Nov 25, 2012 4:25:24 GMT -5
Here is how I did the wiring. Automatic open and close with less current applied to the switch. Uses stock switches. Got mine at Princess Auto, made by ICI www.princessauto.com/pal/product/8272502/Actuators/12V-DC-4-in.-Stroke-Linear-ActuatorSorry do not know the part number but here are the specs Stroke 4in. Load Capacity 110lb Static Load 500lb Speed at Max Load 0.50in./sec 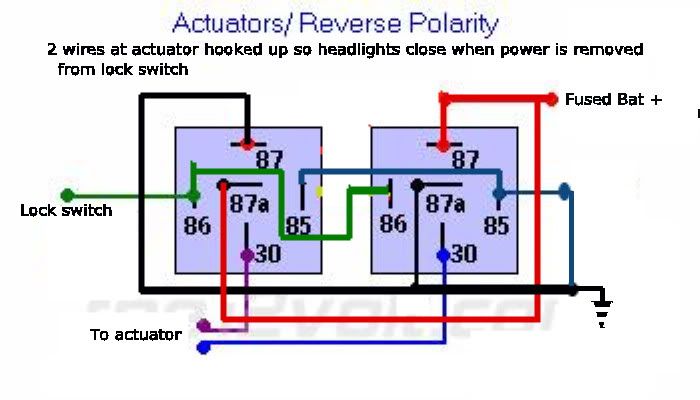 This wiring results in the lights opening if the headlights sw is on AND the lock sw on. They will close if either sw is turned off. There is zero parasitic draw on the battery when turned off. By supplying the headlight sw with IGN controlled 12v instead of constant BATT 12v, the headlights will automatically turn on and open when the car is started {if the HL and lock switch are on} and close when the car is turned off. UPDATE: A fellow builder asked me the following:My actuator has 5 wires coming out: Red, Black, White, Purple,Yellow. Do I ignore the others and just use the red and black? Yes, you ignore the remaining 3 wires. Only the red and black are used. They are connected to the relays so that when power is removed from the "lock" wire, the headlights retract into the body. |
|
|
|
Post by kensaw210 on Nov 25, 2012 9:57:26 GMT -5
Thanks, Bradley 85 just the information I needed.
|
|
|
|
Post by bradley85 on Nov 25, 2012 11:03:20 GMT -5
|
|
zaucy
Full Member
  
Posts: 127
|
Post by zaucy on Nov 25, 2012 15:46:32 GMT -5
|
|
|
|
Post by mrbigh on Nov 25, 2012 18:04:13 GMT -5
I guesstimate that the modification of the headlights buckets with an electric actuator is one of the best and more user friendly of them all
|
|
|
|
Post by Dan MacMillan on Nov 25, 2012 18:34:40 GMT -5
Yes, my brackets are welded as are all sections of the bar. Make sure the headlights are closed before welding. |
|
zaucy
Full Member
  
Posts: 127
|
Post by zaucy on Nov 25, 2012 19:24:52 GMT -5
Alright, great, thanks.
|
|
|
|
Post by Dan MacMillan on Nov 25, 2012 19:46:57 GMT -5
Install the acuator first to make sure the travel is right before making it permanent.
|
|
zaucy
Full Member
  
Posts: 127
|
Post by zaucy on Nov 25, 2012 20:26:40 GMT -5
Yeah, that was my plan. I was going to rely on the bolts for a day or two after I install the actuator to make sure I have the light buckets positioned where I want, and then take the Bradley to a friends to weld together. Thanks for advice. I should hopefully have the final results posted on this thread within the next couple weekends.
|
|
zaucy
Full Member
  
Posts: 127
|
Post by zaucy on Dec 1, 2012 21:24:18 GMT -5
I have received my linear actuator from Ebay. Although I have only tried attaching it to a battery to make sure its functional, the actuator has been doing its job so far. I just fabricated the mounting bracket today, with some help of a friend. Here is what I have far, the design was inspired by bradley85's pictures, thanks.    Everything was purchased at home depot, the biggest thing was finding the relatively thicker angle iron. The holes drilled in the bracket for the pin are barely off, which will result in strain on the bolt between the actuator and headlights; I hope this isn't going to be an issue down the road :/. I will continue to edit this post when I complete more. |
|
|
|
Post by jspbtown on Dec 2, 2012 10:39:53 GMT -5
I used several actuators to control the front and rear hatches on my Avenger.
Instead of running a bolt through the end of the actuator (to the headlight arm on this application) I took a small section of steel tube that I cut to slide slid over the end of the actuator. It is just slightly longer than the end of the actuator. I then drilled a hole through it so I could run a bolt through the actuator hole to attach it.
To this sleeve (the tube) I took a bolt that I welded to a washer (roughly the same diameter of the sleeve) and welded it (along with the washer) to the end of the sleeve. So you now have a stud coming off of the end of the actuator.
Attached to this stud I screwed a heim joint. These are readily available at your local ACE hardware store.
With this set up you have adjustability, some room for error in the alignment, and smooth operation.
I think I might have some pics if needed.
|
|
zaucy
Full Member
  
Posts: 127
|
Post by zaucy on Dec 2, 2012 15:40:08 GMT -5
That seems like a good idea, but I'm not so sure it will help my issue. Here is an idea of what I expect to happen.  I don't really have a way of measuring the angle that's created by the actuator, but I can see that the actuator is oriented slightly off. I don't think its really going to be an issue if I just used a bolt, but it's a small concern. It took me a couple of reads to understand your description, but I understand what you did now; it's a flexible and modular design, I like it. Using the heim joint will give me flexibility in the rotation of the hole, but it won't fix the change in distance, right? The flexibility in the rotation of the hole would be nice, but since I don't have a welder readily available to me, I'm not so sure I will build a stud like you. Thanks for the ideas!!! |
|
|
|
Post by Dan MacMillan on Dec 2, 2012 16:10:56 GMT -5
Here is a crude drawing of how I did it. 4" actuator is perfect.
[img src="http://i61.photobucket.com/albums/h58/davidsigouin/actmount.jpg["]
|
|
|
|
Post by jspbtown on Dec 2, 2012 16:26:17 GMT -5
Well the heim joint has a threaded boos thats about 1" or so, so that will give you about an inch of added stroke (or reduced stroke). And yes, the eye of the heim joint will allow some adaptability for off center design
|
|
|
|
Post by kensaw210 on Dec 10, 2012 19:09:02 GMT -5
I got my Actuator today took a second look at in information and was wanting to ask about the spring you put on the actuator it that to make it close?
|
|
|
|
Post by Dan MacMillan on Dec 10, 2012 19:29:10 GMT -5
The spring, be it the original torsion spring or an add on compression spring is not used to make it close. It is used to balance the weight of the headlights. Doing this puts mimimal strain on th actuator and mounting points.
You adjust the spring tension before connecting the actuator so that the headlights open and close with equal force.
|
|
zaucy
Full Member
  
Posts: 127
|
Post by zaucy on Dec 18, 2012 23:40:21 GMT -5
Sorry for the late finished up reply, I was having some camera issues. So I was going back and forth on the dp dt switch or two relay setup, I ended up using the two relays with the original wiring (only needed to move the constant 12v wire by the switches). 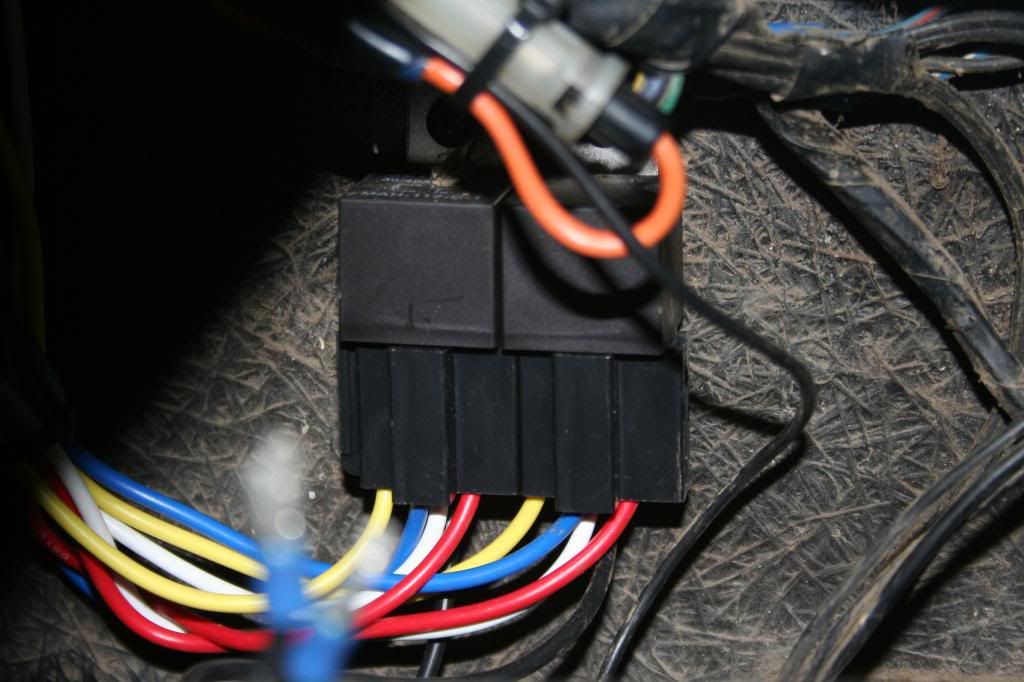 I also had a friend weld the headlight buckets to the rotating bar, which now gives me better peace of mind when driving at night. 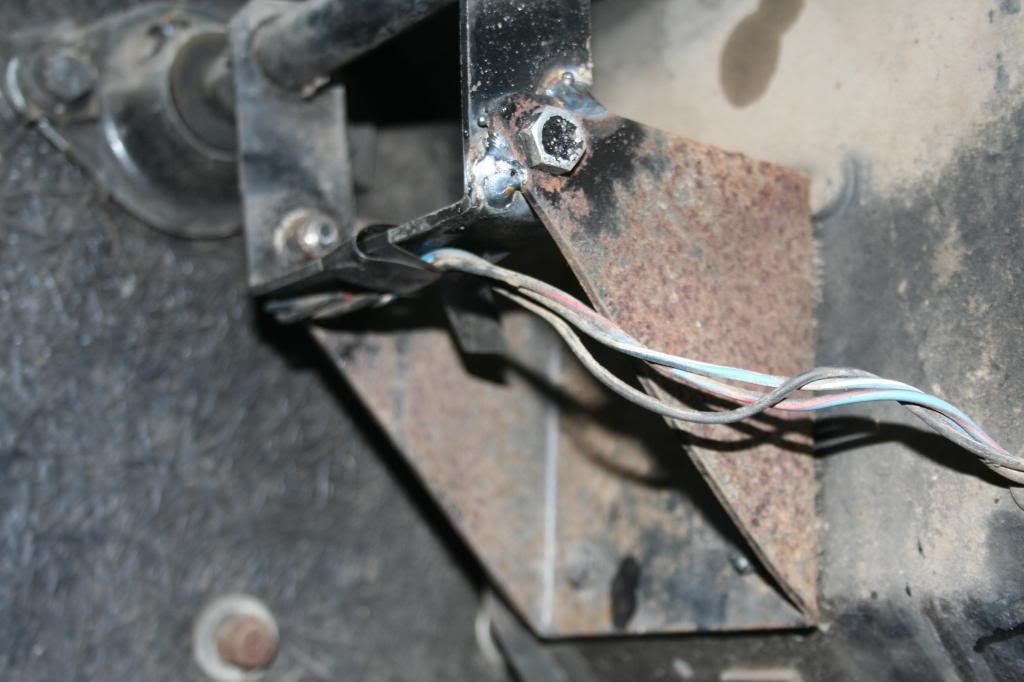 I used a long bolt from ACE, a long spacer, some washers and a lock nut to connect the actuator to the rotating bar. I used a slightly larger bolt than the actuator's already drilled out hole, this allowed me to find a very similar sized drill bit for a tight fit. I forgot what type of bolt it was, but it was treated to have an incredible strength compared to standard steel bolts. At first this connection seemed weak to me, but it has been holding up well and has no loose bolt movement when the actuator is opening and closing. 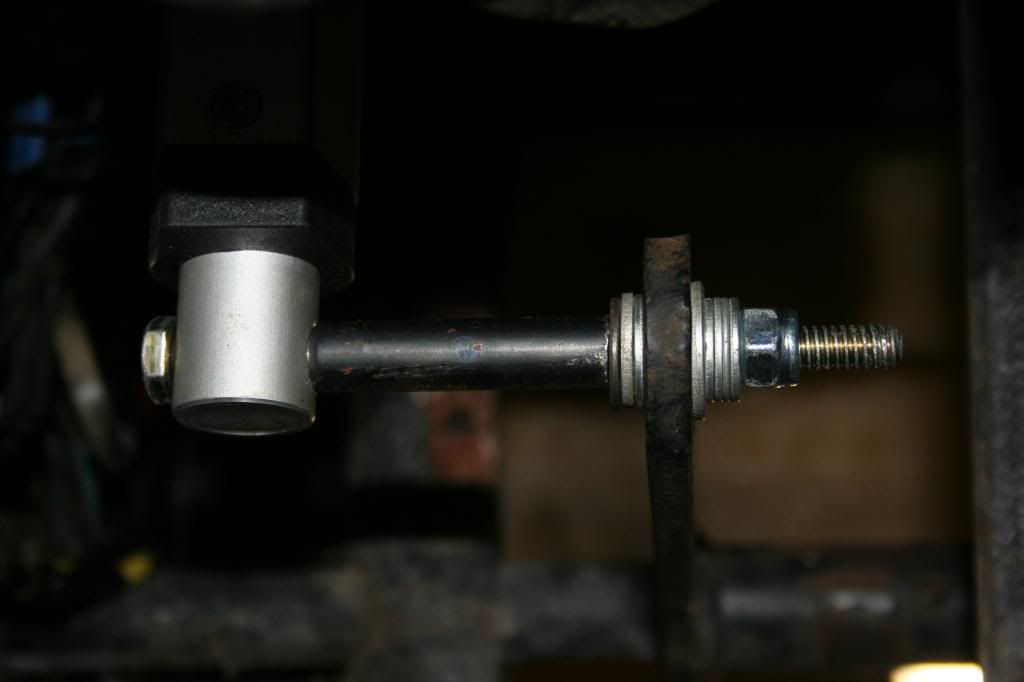 I removed the torsion spring and limit switches. Torsion spring: because the rated load was 250lbs and because i could lift the headlights by hand, I would guess they exert about a 50-60lb force which is well under the rated load(although the exerted force does vary when driving). Limit switches because the actuator stroke is well under the rotational length of the headlights. LAST, it turns out the fuse in one of the pictures was burnt out so I guess my original headlight motor is working. After I check the motor is working, It will be posted on the classifieds. shopping list: Actuator: www.ebay.com/itm/330766494234?ssPageName=STRK:MEWNX:IT&_trksid=p3984.m1497.l2649Relays: www.amazon.com/gp/product/B005HFYE1O/ref=oh_details_o00_s00_i00Mounting bracket: angle iron from Home Depot Hardware mounting actuator to lights: bought it all at ACE. |
|
|
|
Post by Dan MacMillan on Dec 18, 2012 23:51:46 GMT -5
Reinstall the torsion spring. It greatly reduces the strain on the actuator mounting points. Without it the mounts will bend when hitting bumps. Glass may start cracking as well
|
|
zaucy
Full Member
  
Posts: 127
|
Post by zaucy on Dec 19, 2012 0:24:37 GMT -5
Glass may start cracking? Do you mean the headlights?
|
|
|
|
Post by Dan MacMillan on Dec 19, 2012 8:18:22 GMT -5
No, the fibreglass body where the actuator is mounted.
|
|
zaucy
Full Member
  
Posts: 127
|
Post by zaucy on Dec 19, 2012 11:33:14 GMT -5
Oh right, the fiber glass. It will likely be reinstalled soon, Thanks Dan.
|
|
|
|
Post by skip20 on Apr 1, 2013 7:24:03 GMT -5
|
|
|
|
Post by Roodog on Apr 1, 2013 16:44:22 GMT -5
Thanks for the info skip. I'm working on headlight flaps and was tossing around ideas on how to run them. Every thing that I have looked at is non adjustable so I need to know the exact push pull.
|
|