|
|
Post by skip20 on Jun 23, 2010 17:49:25 GMT -5
OK, I'm back, but not working on my Bradley SS. It's my friend GT body work. Driver side was pushed in so made a mold of the fender & side scoop I got from member Bob Nilson. Cut out the section of the damage & still need to trim to fit. Will glass in the other side side scoop later. I sell the side scoops for $55.00 a pair & the look like the right side one, not the side fender. Pictures to follows.  Left fender cut out sitting on ground.  Mustang scoop fender sitting on car  Right side scoop propped on tire. |
|
|
|
Post by vallyr on Jun 24, 2010 16:37:18 GMT -5
I have some fiberglass repair to do on my bradley in several places. Above the right front wheel well a good sized chunk is missing and along the other wheelwells its starting to crack away a bit. On the front grills the tail lights wont stay in because they cracked out.
Ive torrented a couple of videos on fiberglassing but they didnt really help me.
Could some one write a step by step tutorial with some pictures to help me overcome my these problems maybe?
So far i went to napa and bought a fiberglass repair kit that has this giant bucket of resin, a small clear tube of what id guess is hardener and a 8foot sheet of this woven cloth.
|
|
|
|
Post by jspbtown on Jun 25, 2010 10:21:39 GMT -5
Here are some pics when I bonded the upper and lower sections. The process is all the same. First, you need to grind the area to be repaired back. How far back depends on the repair. For a small crack it might be 1" in both directions. For bonding panels it might be 2" back. The ground area should taper from paper thin in the endge of the repar, back to the full thickness of the surrounding glass. 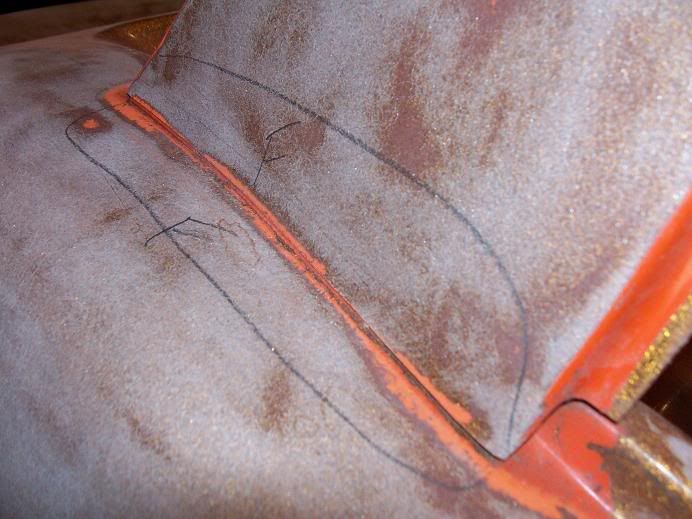 After grinding, the area should be cleaned thoroughly with acetone. For repairs on the outside fiberglass matt (not cloth) should be used. Cloth is very strong and can be used on the back side of any repair. I mix the resin in small disposable aluminum foil pans and use disposable brushes. The matt should be applied and soaked with resin. Extra resin should be rolled out with a roller, or dabbed with a brush. 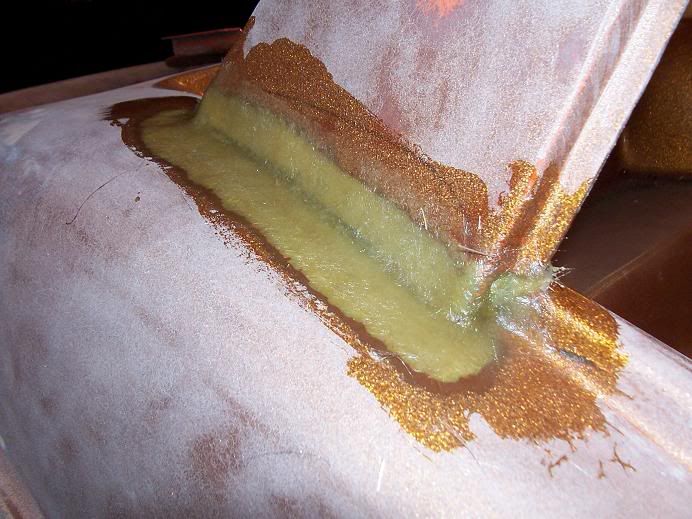 One cured it can be shaped with 80 grit paper and skim coated with a quality filler: 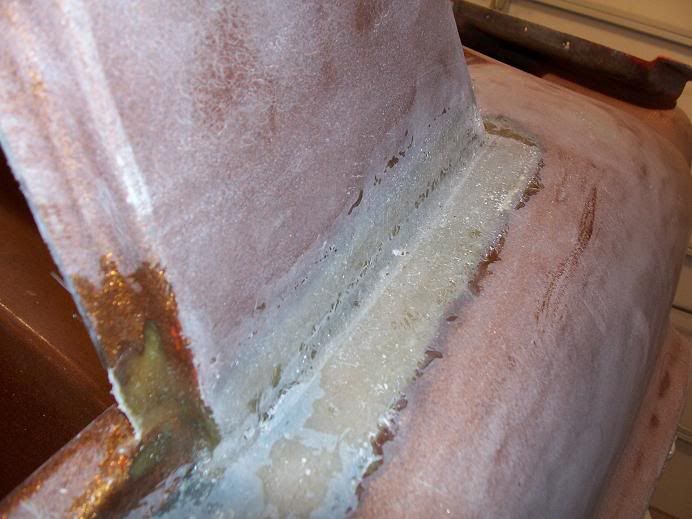 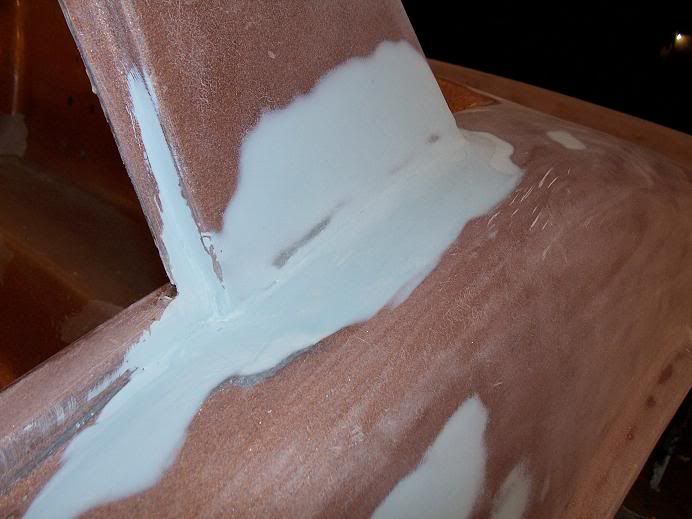 Prime with a quality primer like Evercoat G2 and fill any pinholes with a 2 part putty: 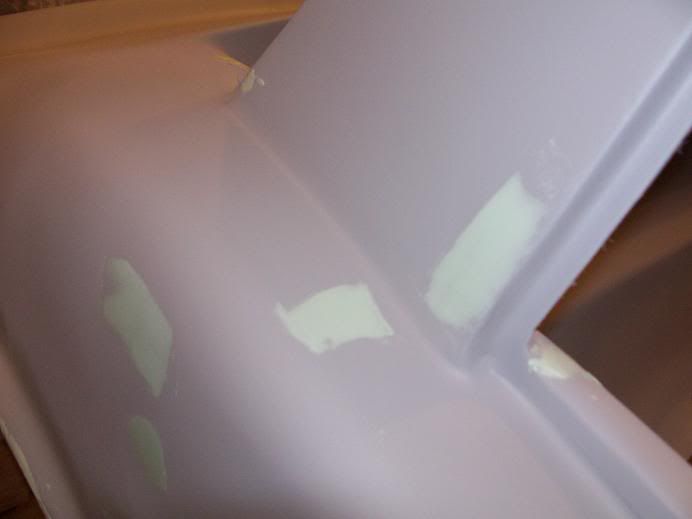 And paint: 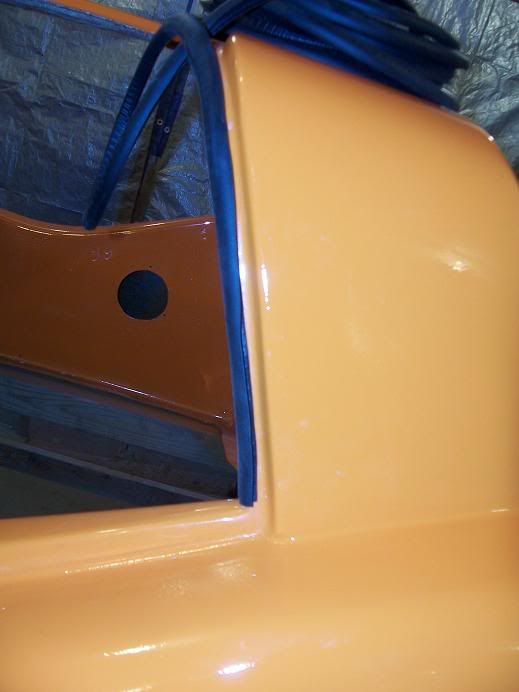 |
|
|
|
Post by vallyr on Jun 25, 2010 11:04:57 GMT -5
That was really helpful! Do you have to grind the gel coat 100% away from the area though? hard to tell in your photo.
Also my bradley is plagued by bubbles on the roof, dash, and parts of the hood. Is there a special way to deal with this or should I just sand it down and coat over it with bondo or cats hair bondo or lay a single sheet of mat over it?
|
|
|
|
Post by jspbtown on Jun 25, 2010 11:17:47 GMT -5
The ground area should be paper thin nearest the crack and back to gelcoart level. So, all gelcoat and 90% of the glass is removed in the center of the repair.
Bubbles? In the fiberglass?
If they are in the glass and not through like cracks, then I would grind them out. If they are shallow then some good filler would be just fine to repair them.
|
|
|
|
Post by skip20 on Jun 25, 2010 15:18:36 GMT -5
That is a good write up w/pictures on glassing. Will be showing how to as I do this & other mod's. They make a roller to roll out the mat/resin & remove air bubble. You can get them from a Fiber Gall supplier. THEY ARE A MOST HAVE ITEM, about 6 - 15.00 each Below is a drawing showing the wedge cut to do. I cut back 2-3 inches & use the mat to fill the cut. Air in the mat or to much resin will make it weak. Do the inside as will if you can get to it, will help to support the the seam. Join 2 sheet of paper with tape on one side & check it, the add tape to the back & see the different.  |
|
|
|
Post by centralvalleygter on Jun 28, 2010 11:55:19 GMT -5
Thanks jspbtown & skip20 for taking the time to give detailed explanations on the art of fiberglassing in this application. Those posts took much more than a minute or two to generate. I gave each of you a Karma for your positive contributions.
Warmest Regards,
|
|
|
|
Post by Jeff Troy on Jun 28, 2010 15:06:48 GMT -5
Excellent tutorial. That's about as clear as anything I've seen, and will become immediately understandable as soon as the follower begins to work.
Regarding "bubbles," "pinholes" and "blisters:"
Air between laminates, or areas where resin hasn't penetrated thoroughly, can cause blistering (bubbles), so be sure to work "wet."
Pinholes are from one thing and one thing only -- contamination. This means that your hands, tools and anything else you work with should be spotlessly clean before laying cloth or resin.
Wash your hands and all surfaces to be coated with lacquer thinner or alcohol. Many shops recommend Prep-Sol, but I do not. It has a slippery, grease-like content all its own, and I wouldn't trust it.
Again, my compliments on a great -- and sorely needed -- tutorial.
Warmest...
|
|
|
|
Post by vallyr on Jun 28, 2010 15:22:19 GMT -5
I agree with Jeff 100% sorely needed tutorial!
So I'm starting to create a list of steps in my head.
*aquire rollers, gloves, dust mask, and respirator?
*need fiberglass mat not cloth
* sand from 3-4 inches out down to paper thin at the point of repair
*clean surface with acetone
* mix resin with hardener? Only as much as id use in 10 minutes
*layer on resin and mat in layers rolling any bubbles out as I go
*let cure then sand and paint?
|
|
|
|
Post by jspbtown on Jun 28, 2010 15:35:43 GMT -5
Some little hints:
*aquire rollers, gloves, dust mask, and respirator? - Disposable paint brushes (the little white bristle brushes), disposable foil baking pans & latex gloves (double them up so you always have a clean pair on). A metal roller is VERY nice but not required.
*need fiberglass mat not cloth - Yes
* sand from 3-4 inches out down to paper thin at the point of repair - Depending on the side of the crack and/or repair. The larger the crack, or the more stressful the location, the bigger the taper.
*clean surface with acetone - After grinding. I use a 4 1/2" grinder with a grinding wheel to make fast work of the tapering.
* mix resin with hardener? Only as much as id use in 10 minutes - Depends on temp and humidity...but yes.
*layer on resin and mat in layers rolling any bubbles out as I go - yes.
*let cure then sand and paint? - Shape with 80 grit, fill any pinholes with a 2 part putty, prime with a high build primer, block sand, paint.
Its fun times!
|
|
|
|
Post by vallyr on Jun 28, 2010 23:23:40 GMT -5
aside from any totally new fabrication this looks to be my biggest challenge. This is the front passanger side fender area. As you can see its cracked off and bowed out. Any suggestions or tips? should I try to lift that side while im fiber glassing it. Also tips on getting the flare towards the edge? Should I create some kind of backing mold?  |
|
|
|
Post by jspbtown on Jun 29, 2010 8:06:16 GMT -5
Pic doesn't show for me. Could be a work firewall. Does anyone else see it?
|
|
|
|
Post by Gary Hammond on Jun 29, 2010 8:10:37 GMT -5
Hi Ray,  Any suggestions or tips? should I try to lift that side while im fiber glassing it.  Looks to me like stress damage due to no support under the nose of the body.  This is typical damage when the support tubes are missing.  I looked back at all the pictures you've posted and didn't see the support tubes in any of them. This area can also be damaged while raising the body by lifting at the nose. The proper way to lift the nose is to position a long board or pipe from side to side under the front wheel openings and lift from each side.  Sorry, but I can't answer the rest of your questions about the actual fiberglass repair. I have no experience in that area.  But any repair you do will require the nose support tubes to prevent recurring damage in this area.  Gary Hammond,   |
|
|
|
Post by jspbtown on Jun 29, 2010 8:36:03 GMT -5
Darn work firewall! What do they expect of me when I am here.....work? Here are some pics of the front braces I made. They were about 50lbs lighter then the monster pipes that were on the car when I got it. 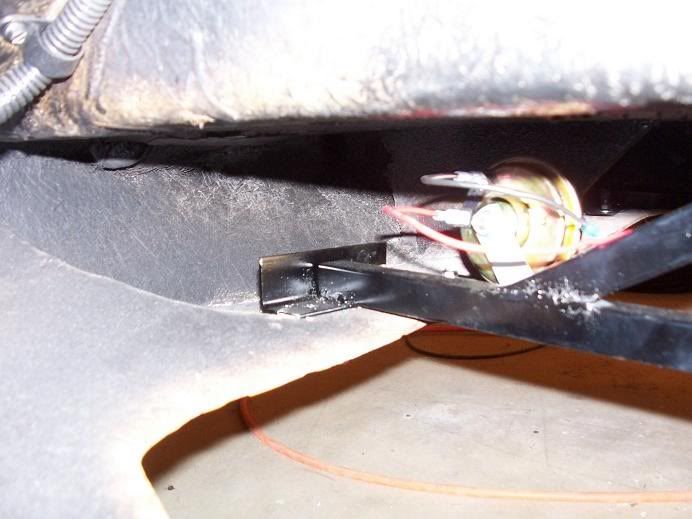 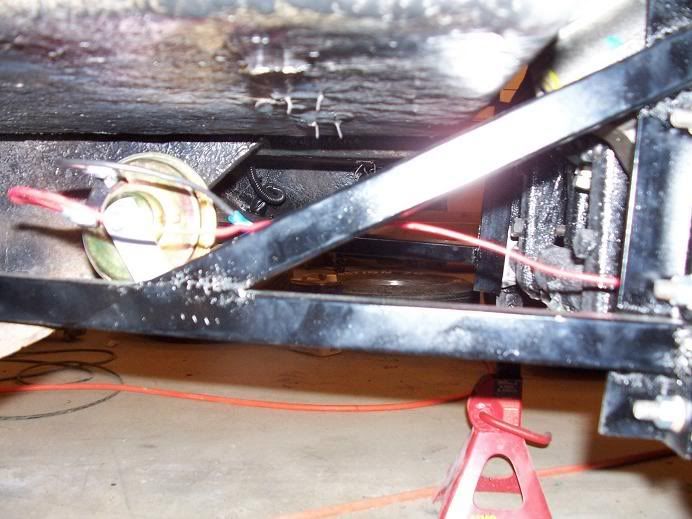 Under the front of the nose there was a piece of 2 1/2" flat stock that bolted up though the glass and into the braces. |
|
|
|
Post by vallyr on Jun 29, 2010 11:40:25 GMT -5
*:checks*
No support tubes that I could see. I was suspicious of stress damage. Only support for the nose is the glassed over plywood that is part of the body. when i purchased it there was an enormously heavy bar and tube system used to open and close the head lights but it was just hanging from the nose. Also the bumpers were just held on with a Ubolt and thus were also hanging on the nose.
Ive since removed those but never the less.
Could you elaborate some more on your supports and where they run to and from off the chasis to the nose etc?
|
|
|
|
Post by jspbtown on Jun 29, 2010 12:06:41 GMT -5
They are run off the front torsion tubes.
If you look at the second picture you can see 3 threaded sections and two nuts to the far right. Those are muffler clamps going around the torsion tubes. Attached to them is a vertical piece of 1.5" angle iron. Off of that angle iron I welded a horizontal 1" square tube and the diagonal 1" square tube.
The diagnonal and horizontal tubes fall in between the two nuts on the muffler clamps. At the end of the horizontal tube I welded a short section of 1.5" angle iron (as seen in the first pic).
In each of those short sections of angle I drilled two holes (on on each side of the 1" tube). On the other side of the body (so.... small section of angle, then fiberglass body, then flat stock) I took a 2.5" piece of flat stock and ran it from one brace to the other. I then drilled 4 holes in it to match the holes in the small angled stock at the end of the brackets. I also used a section of cabinet liner (I know...not the best, but it was rubber like) between that flat stock and the body to protect the fresh paint.
All of that material is available from Home Depot, except the heavy duty muffler clamps.
I can now see the picture. Here is what I would do. First you need to support that nose. I would fab up some of the brackets that I have explained. The total cost is maybe $30. You need to support the nose before you can make the repair.
Make sure the nose is lifted back into the appropriate position. Fixing it where is is now is just asking for trouble.
After the nose is lifted, then grind the edges back about 1.5" all the way around the piece that is missing. Clean with acetone well. From the back I would use some duct tape to tape some wax paper to the back of the fender. Use just enough wax paper to very slightly extend beyond the repair. Use several layers of duct tape to hold it tightly. Try to form it to the shape of the missing piece.
I would then lay in a couple of layers of matt into the hole. Go about 1" onto your ground area. Your just trying to build a solid surface to add more. Once it cures, roughen it up with some 80 grit, clean, and apply more layers of matt. Apply more than you need. You can then sand it to the shape and fill in any imperfections.
|
|
|
|
Post by centralvalleygter on Jun 29, 2010 13:14:13 GMT -5
Just for the sake of knowing the more pictures the better, here are some pictures I have on my hard drive of the front supports on mine. This pics were taken at various stages of the history of the car.     I know that Gary Hammond has posted some pics of his before also, but I think he was showing how he modified them for Clarence of his anti-sway (torsion) bar. Regards, |
|
|
|
Post by Gary Hammond on Jun 29, 2010 13:25:43 GMT -5
Hi Ray,  The original support tubes are shown and discussed under "Operation 34 - Install Front Bumpers" of the build manual. Jeff Troy included a copy of the build manual in the CD you purchased from him ......so you have a copy. Here is a picture of mine, which I modified to provide clearance for the sway bar. The lower lip of the nose is fastened to the pipe with a u-bolt through a heavy strap underneath.   Gary Hammond,   |
|
|
|
Post by skip20 on Jul 1, 2010 6:58:57 GMT -5
OK, back to work on the Bradley. Been working on the Ford Ranger engine. Both heads are creaked so putting in a used engine Did final trimming on body to fit replacement panel with the Mustang scoop. Using blocks of wood on the flay area, got it screwed on for alignment. Will taper the body & panel to get ready for 1 layer of 1.5oz mat. Screws will be removed & that area will get mat the 2 more layer of 1/5oz mat alll the way around.  Here you can see that this came out of a different MOLD. The rocker panel is about 1" shorter. Will cut lower section back to wheel well & bend down to match.  |
|
|
|
Post by skip20 on Jul 1, 2010 7:05:45 GMT -5
aside from any totally new fabrication this looks to be my biggest challenge. This is the front passanger side fender area. As you can see its cracked off and bowed out. Any suggestions or tips? should I try to lift that side while im fiber glassing it. Also tips on getting the flare towards the edge? Should I create some kind of backing mold?  You can slice the bow area & support the front to get it back into shape. Using cardboard with plastic tape or Alum tape, made backing on the inside of wheel well as backing to reform the lip. Fiberglass will not stick to these 2 tapes so will be able to remove easily. Then glass the inside, sand the outside to finish look. |
|
|
|
Post by skip20 on Jul 1, 2010 7:07:58 GMT -5
|
|
|
|
Post by skip20 on Jul 1, 2010 7:12:08 GMT -5
I agree with Jeff 100% sorely needed tutorial! So I'm starting to create a list of steps in my head. *aquire rollers, gloves, dust mask, and respirator? *need fiberglass mat not cloth * sand from 3-4 inches out down to paper thin at the point of repair *clean surface with acetone * mix resin with hardener? Only as much as id use in 10 minutes *layer on resin and mat in layers rolling any bubbles out as I go *let cure then sand and paint? NOT paper thin at the point of repair about 2/3 the thickness. You will also do the inside to about 1/2 the thickness. |
|
|
|
Post by skip20 on Jul 1, 2010 8:04:09 GMT -5
You RIP NOT CUT the mat to sizes need for repairs The mat will lay flat as you wet it NOT SOAK with resin. If you cut the mat you will have a sharp edge which will be a problem on the next layer & bubbles. Wet the repair area with resin Then lay the mat down & wet it out. I ended up do 2 layers on this 1st layup as I mixed to much resin. As the repair starts to gel, will remove the screws carefully. Will need to sand after it's hard to prep for the next layers. You will notice that this is a thin repair due to being so close to the body edges. Most of the repair & strong will be from the inside layup.    Sorry my 12 year old Nikon COOLPIX995 has seen better days. Someday may buy a new camera! |
|
|
|
Post by kartracer on Jul 8, 2010 15:16:02 GMT -5
Can we use chunky instead of creamy peanut butter? Good way to go green and recycle.
|
|
|
|
Post by skip20 on Jul 9, 2010 18:00:07 GMT -5
creamy peanut butter is better for filling in the gaps , but hard to get in the mat without ripping it.
chunky would be to much sanding later
|
|
|
|
Post by vallyr on Jul 9, 2010 23:25:29 GMT -5
Any one want to sell me a pair of nose supports? My schedule for the next three months is 50+ hour weeks. :S
|
|
|
|
Post by jspbtown on Jul 10, 2010 8:00:31 GMT -5
I have a pair of the original ones..but they weigh about 80 pounds for the pair. Shipping would be brutal.
|
|
|
|
Post by Gary Hammond on Jul 10, 2010 9:08:11 GMT -5
Hi Ray,  Just go to your local plumbing shop or hardware store. The support pipes called out in the build manual are just a couple of 1.25" ID pipes about 38" long each.  Don't know what Jeff has, but 38" of 1 1/4" schedule 40 steel pipe only weighs 7 or 8 pounds each!  Check out "Operation 34" of the build manual for details.   Gary Hammond,   |
|
|
|
Post by vallyr on Jul 10, 2010 12:00:01 GMT -5
oh yeah guess i shouldve checked the manual! I bought my copy of the cd so I suppose Im legit. yeah thats alot easier than what i was picturing from the snippet photos.
|
|
|
|
Post by skip20 on Jul 10, 2010 16:53:32 GMT -5
Been to hot to do very much. Here's the cut out on the inside to glass the fender back on.  Inside the wheel well  Outside showing the scoop installed  Getting ready to transfer cut to other side of Bradley GT  |
|